Dart Tucks
A dart tuck is a dart that is stitched only part of the way toward its point. The stitching stops early and the rest of the fabric is left open, so the extra releases into a soft fold. You still get the shaping of a dart, without the sharp, tailored line.
These go by a few names. You will see tuck-darts, dart tucks and release tucks, and the names are used interchangeably. When you see "release tuck," the stitching is on the outside of the garment, so the fold shows.
A Mid-Century Staple
Pattern books from the 1940s and 1950s use dart tucks all the time. A typical move is to shift a waist dart up into a cluster of shoulder or neckline tucks. The bodice keeps its fitted waist, and the chest and shoulders get a soft, blouse-like fullness.
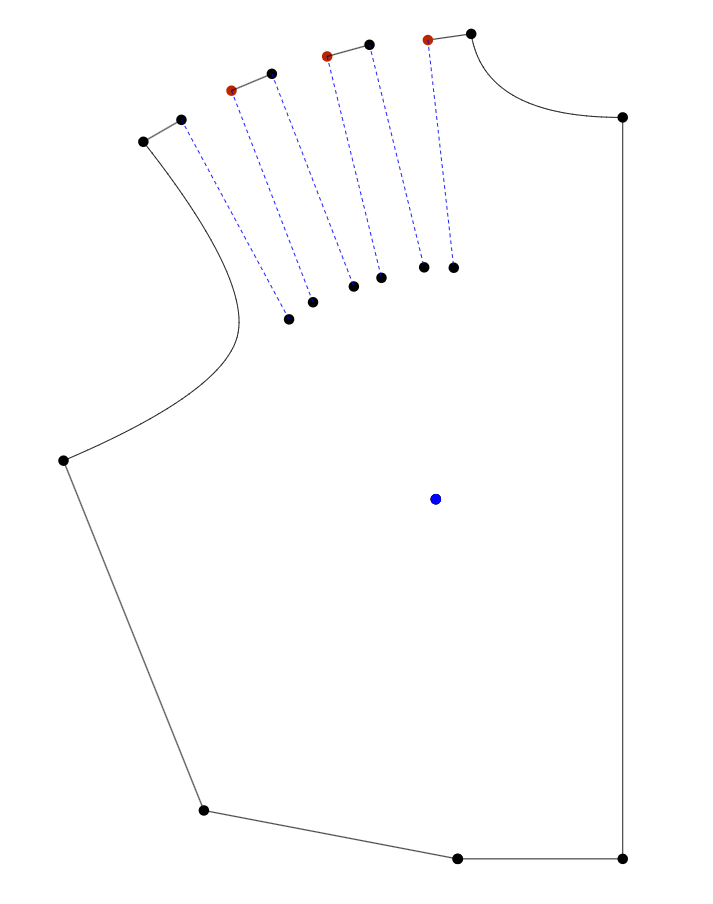
Single Waist Dart Shifted into Three Shoulder Dart Tucks
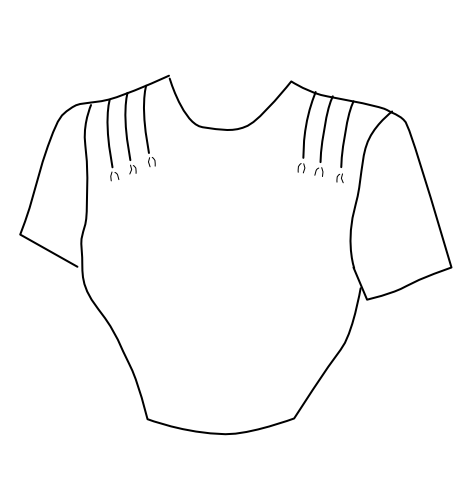
Dart Tucks Sewn
How Dart Tucks Work
What sets a dart tuck apart from a plain dart is where the stitching ends.
- Standard Dart: Stitched from the seam edge all the way to the point, tapering so the fabric lies flat over the curve of the body.
- Dart Tuck: Stitched from the seam edge along legs that are parallel or only slightly tapered, and stopped at a release line you choose.
The part you leave unstitched opens into a soft fold. Where you stop is a style choice, and it depends on how much drape you want. Most people look better when waist dart tucks end about 2" (5 cm) below the bust, though a slender figure can carry a waist dart stitched all the way, and it looks young.
You can press the fold two ways. Press it to one side for a knife pleat, or press it flat on both sides of the stitching for an inverted pleat.
Do not stitch tucks as dead-straight parallel lines. Taper them very slightly, so they lie smoothly. Most dart tucks are sewn from the wrong side, folded double.
Drafting Dart Tucks by Hand
You make a cluster of dart tucks by dividing one dart's intake among several slash lines. Here is a waist cluster, the way the drafting books do it:
- Set a Guideline: Square a line out from each dart leg, about 1" (2.5 cm) below the bust point. The tuck stitching will stop here.
- Draw the Slash Lines: Draw lines parallel to the guideline about 1" (2.5 cm) from the dart legs, and connect each to the bust point.
- Slash and Spread: Cut along the lines up to the bust point, but not through it. Close the original dart, which spreads the intake evenly among the new openings.
- Mark the Stitching: Draw the legs of each tuck down to the waist, stopping the stitching about 1/2" (13 mm) below the guideline. For a slimming effect, you can taper the tucks to about 3/4" (2 cm) at the waistline.
The extra can fold toward center front or toward the side seams. Either way, the tuck does not change the fit. Choose by how you want the garment to look.
When a bodice has several darts, it works better to make most of them tucks, ease or shortened darts. Stitch none, or at most one, all the way to the bust point.
Doing It in PatternMaker Pro
Doing a cluster of tucks on paper is slow. You have to space the parallel lines, work out where each one stops, and true every tuck edge.
In PatternMaker Pro, the Move Dart to Dart-Tucks tool does the whole sequence. You place points for the tucks and set the cut-off distance. It recalculates the spread, divides the intake equally, and draws clean tuck shapes ready to sew.