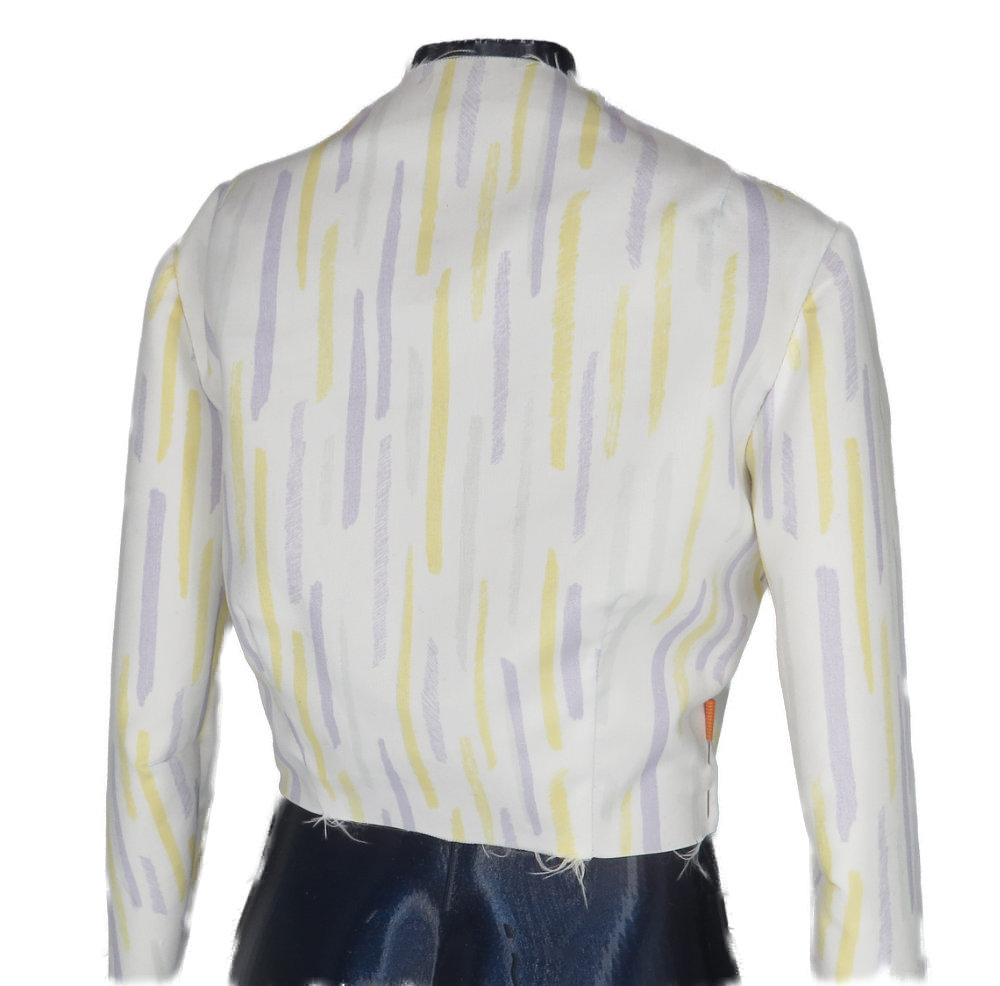
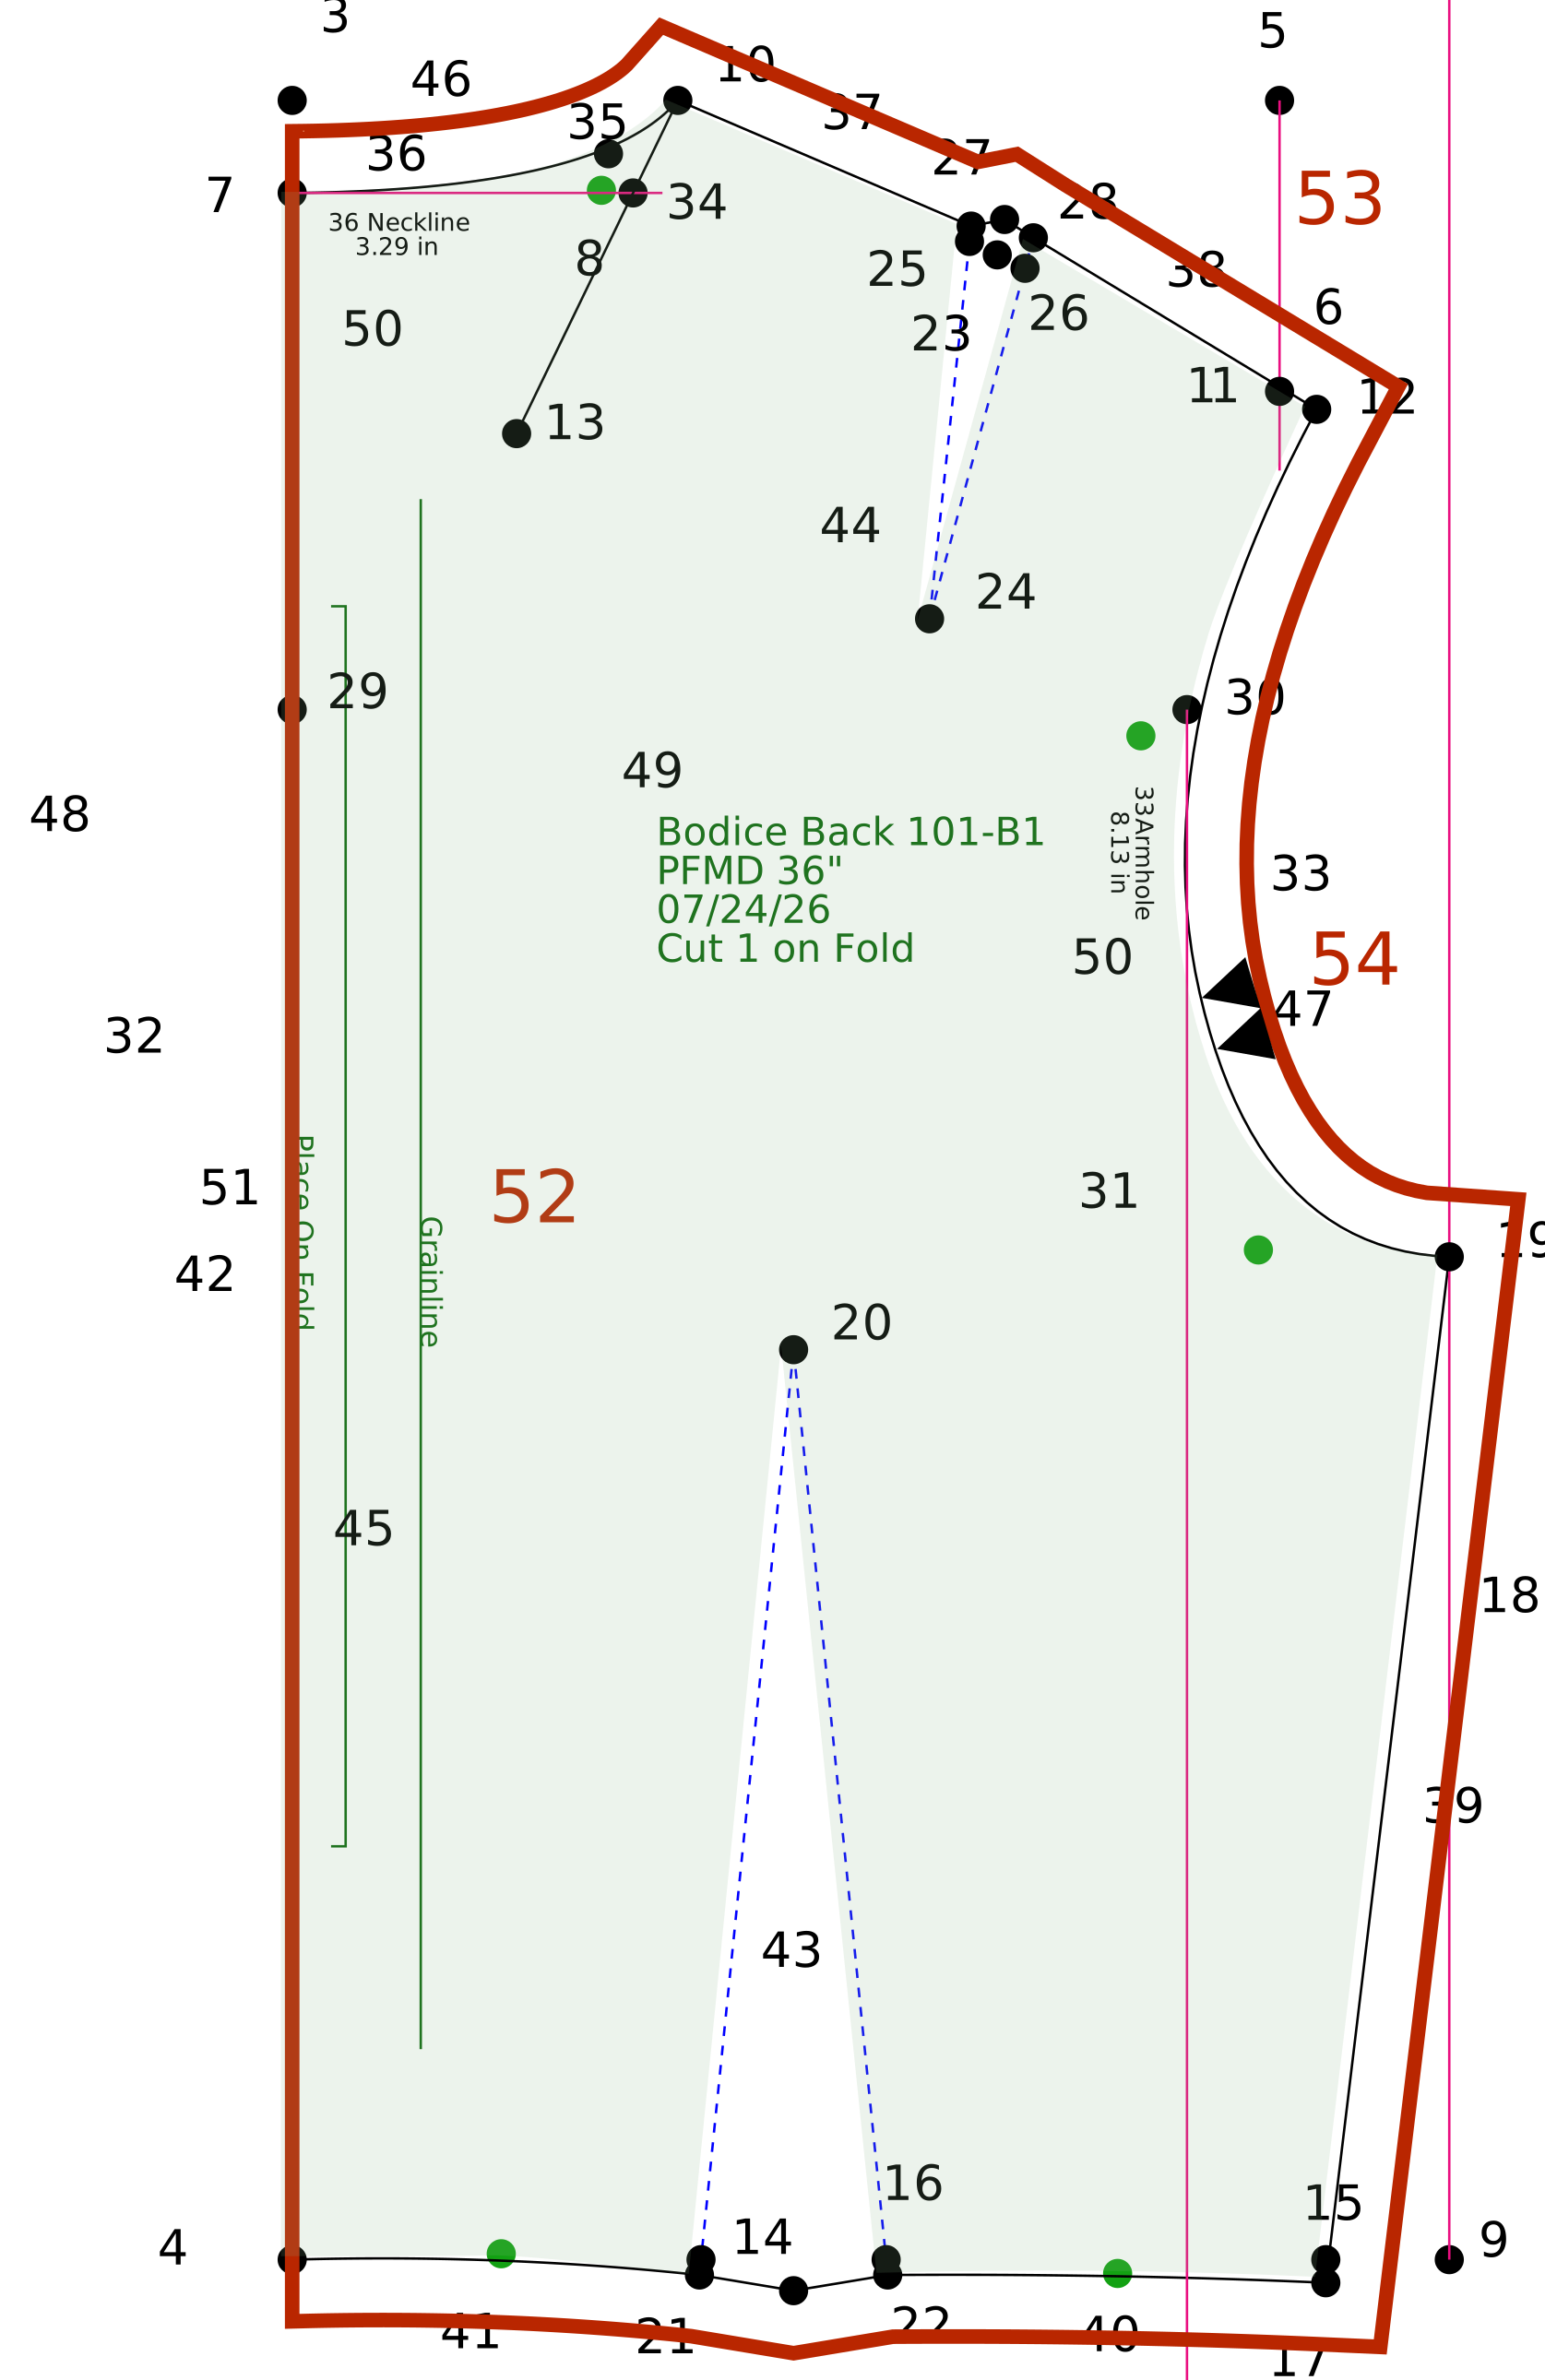
Bodice Back Sample Garment (1/2 scale)
Sizing : Standard Sizing Tables - 36" bust
Adaptation : Patternmaking for Fashion Design (5th Ed), Helen Joseph-Armstrong
Companion Patterns : 101-F1 Bodice Front, 101-S1 Bodice Sleeve
Measurements Used Across Back Bust Back Center Length Back Full Length Back Neck Back Shoulder Across Back Shoulder Length Shoulder Slope Back Side Length Waist Back If you would like to see detailed images of each of these measurements demonstrated on a model and on a sample pattern, please visit the PatternMaker Pro Measurement Definitions page.
New to these instructions? Practice Basics explains point movement, how to read each step and contains other helpful tips.
Companion Patterns
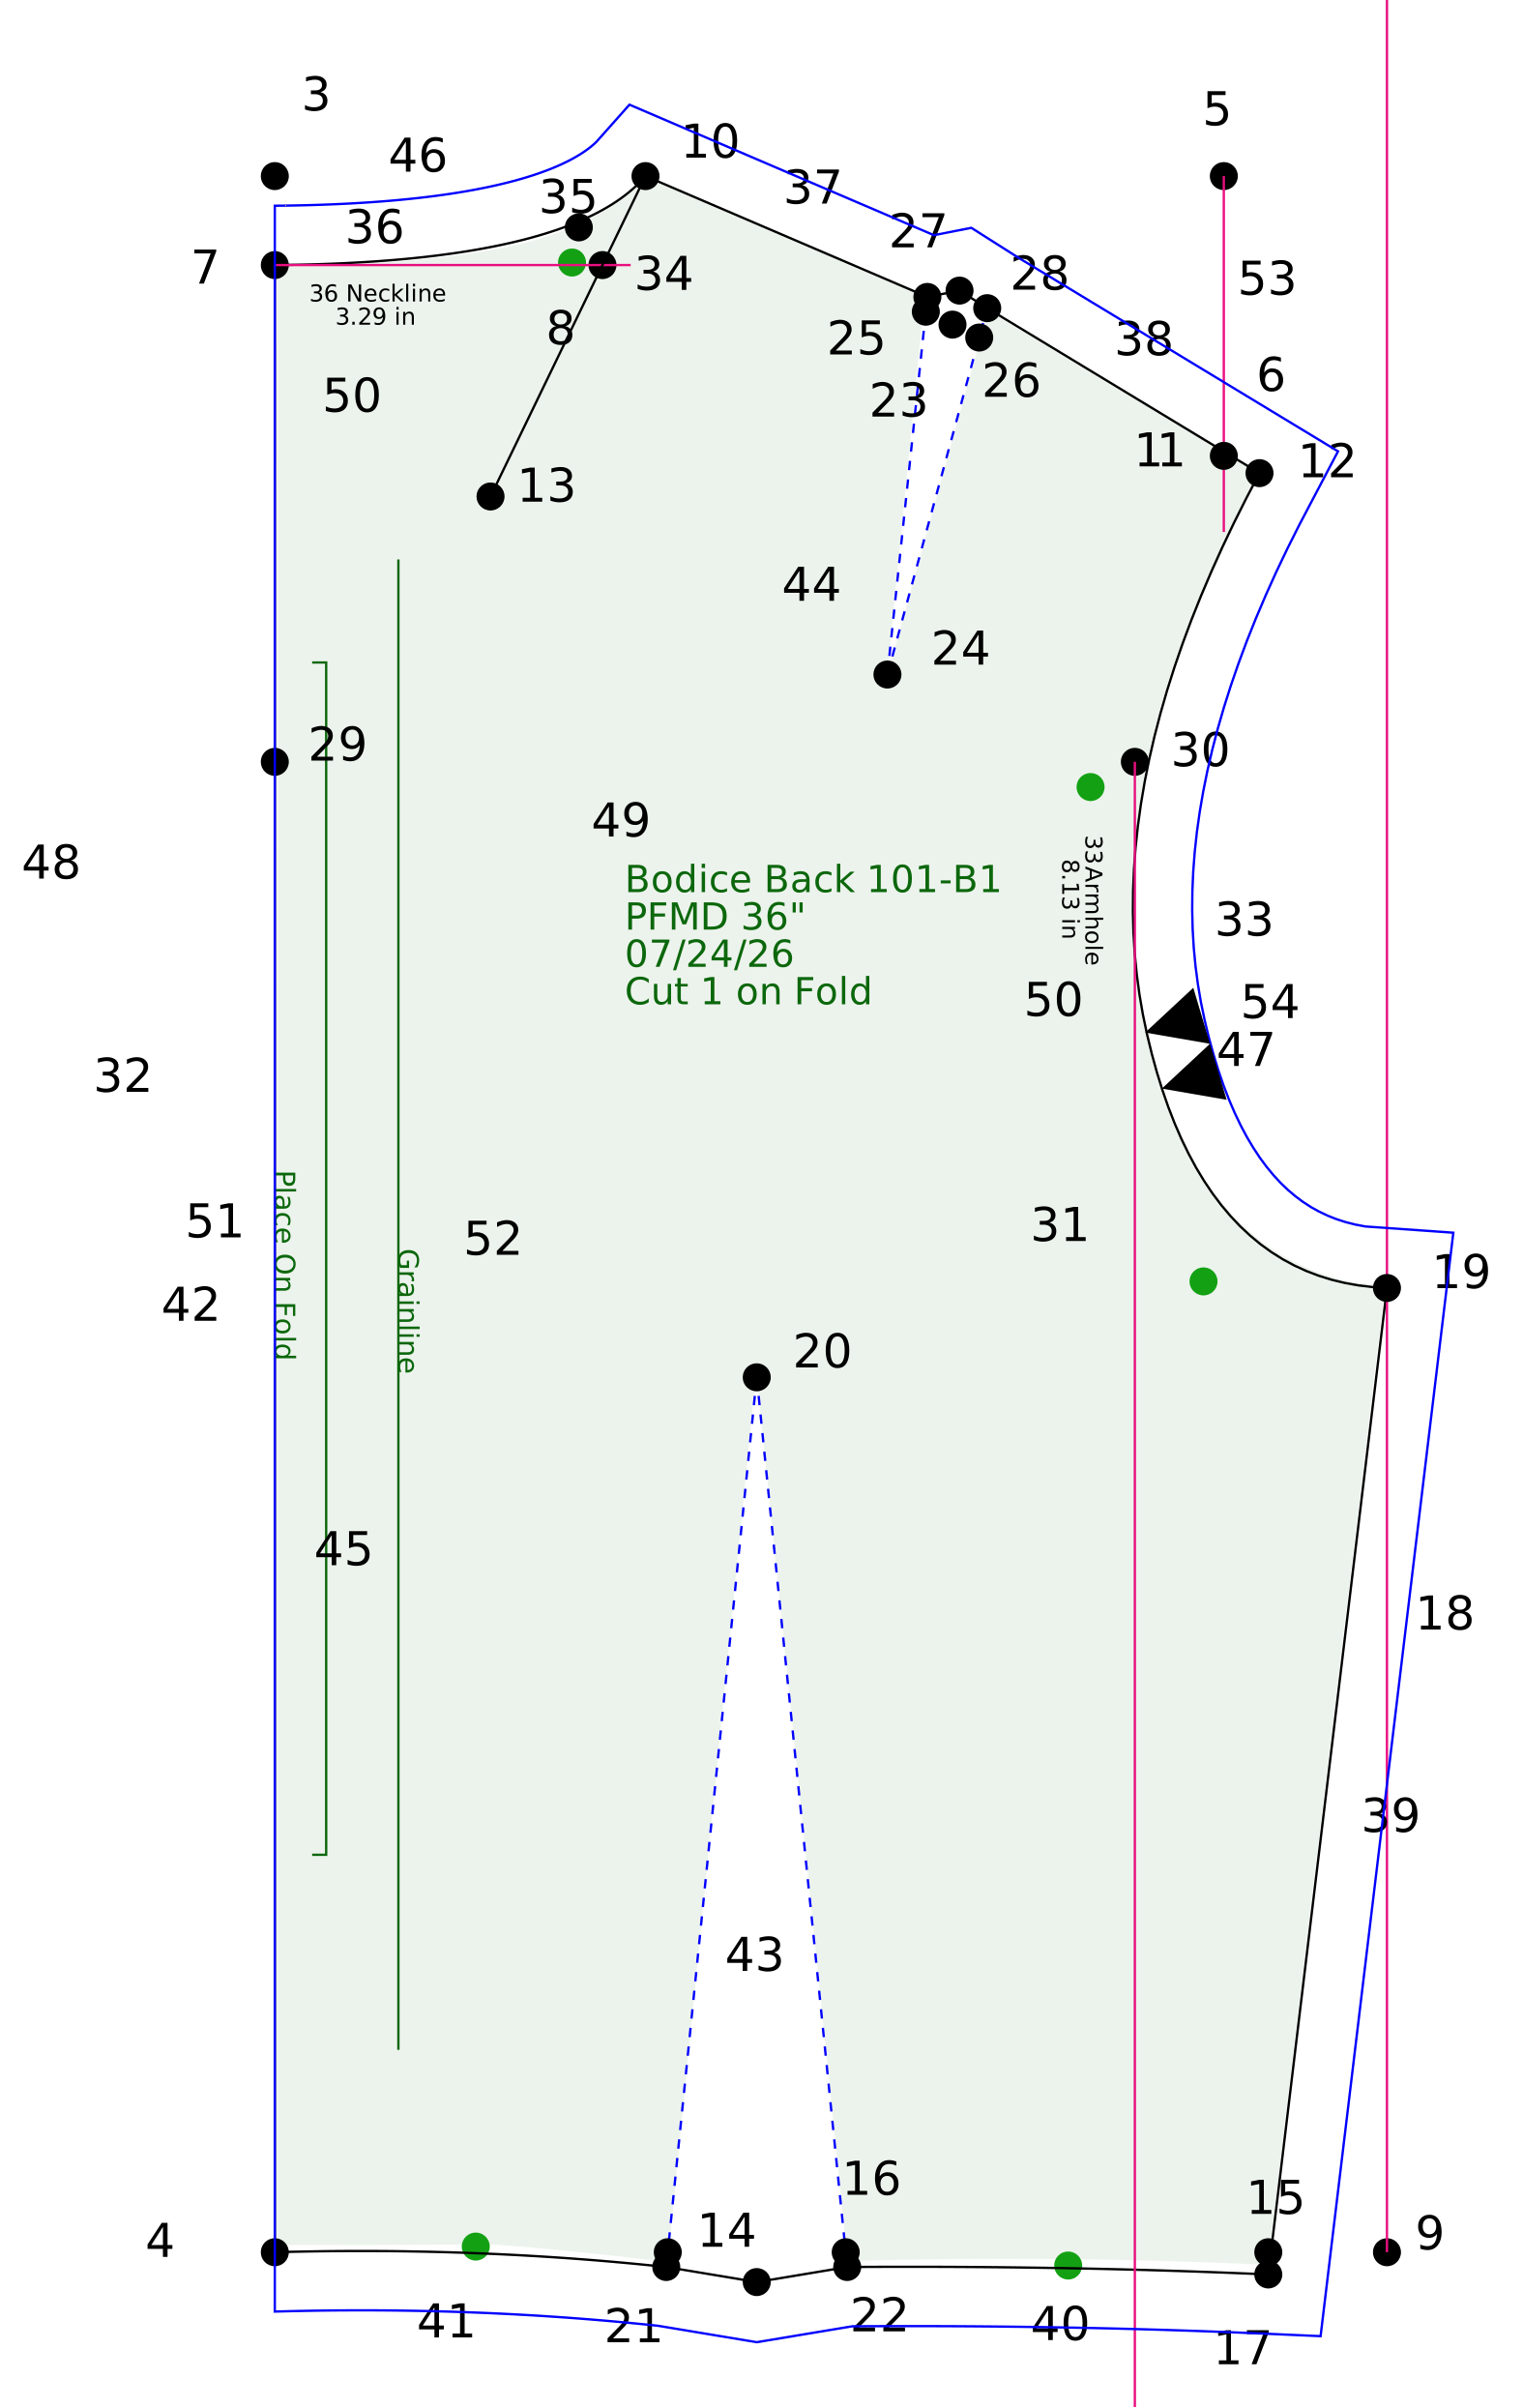
This pattern goes along with the Bodice Front 101-F1 draft. I recommend that you open that draft and add this back pattern to the same file. This allows you to make pattern modifications later that require both the front and back patterns together. Also, this will allow you to true the armhole curves.
Dart Intake
Standard waist dart intake is 1.5" or 38 mm. If the model is petite or junior, the recommended value is 1" or 25 mm.
1 Back Pattern
Parent: PMP
Name: Back Pattern
Save
2 Back Draft
Parent: Back Pattern
Name: Back Draft
Save & Switch
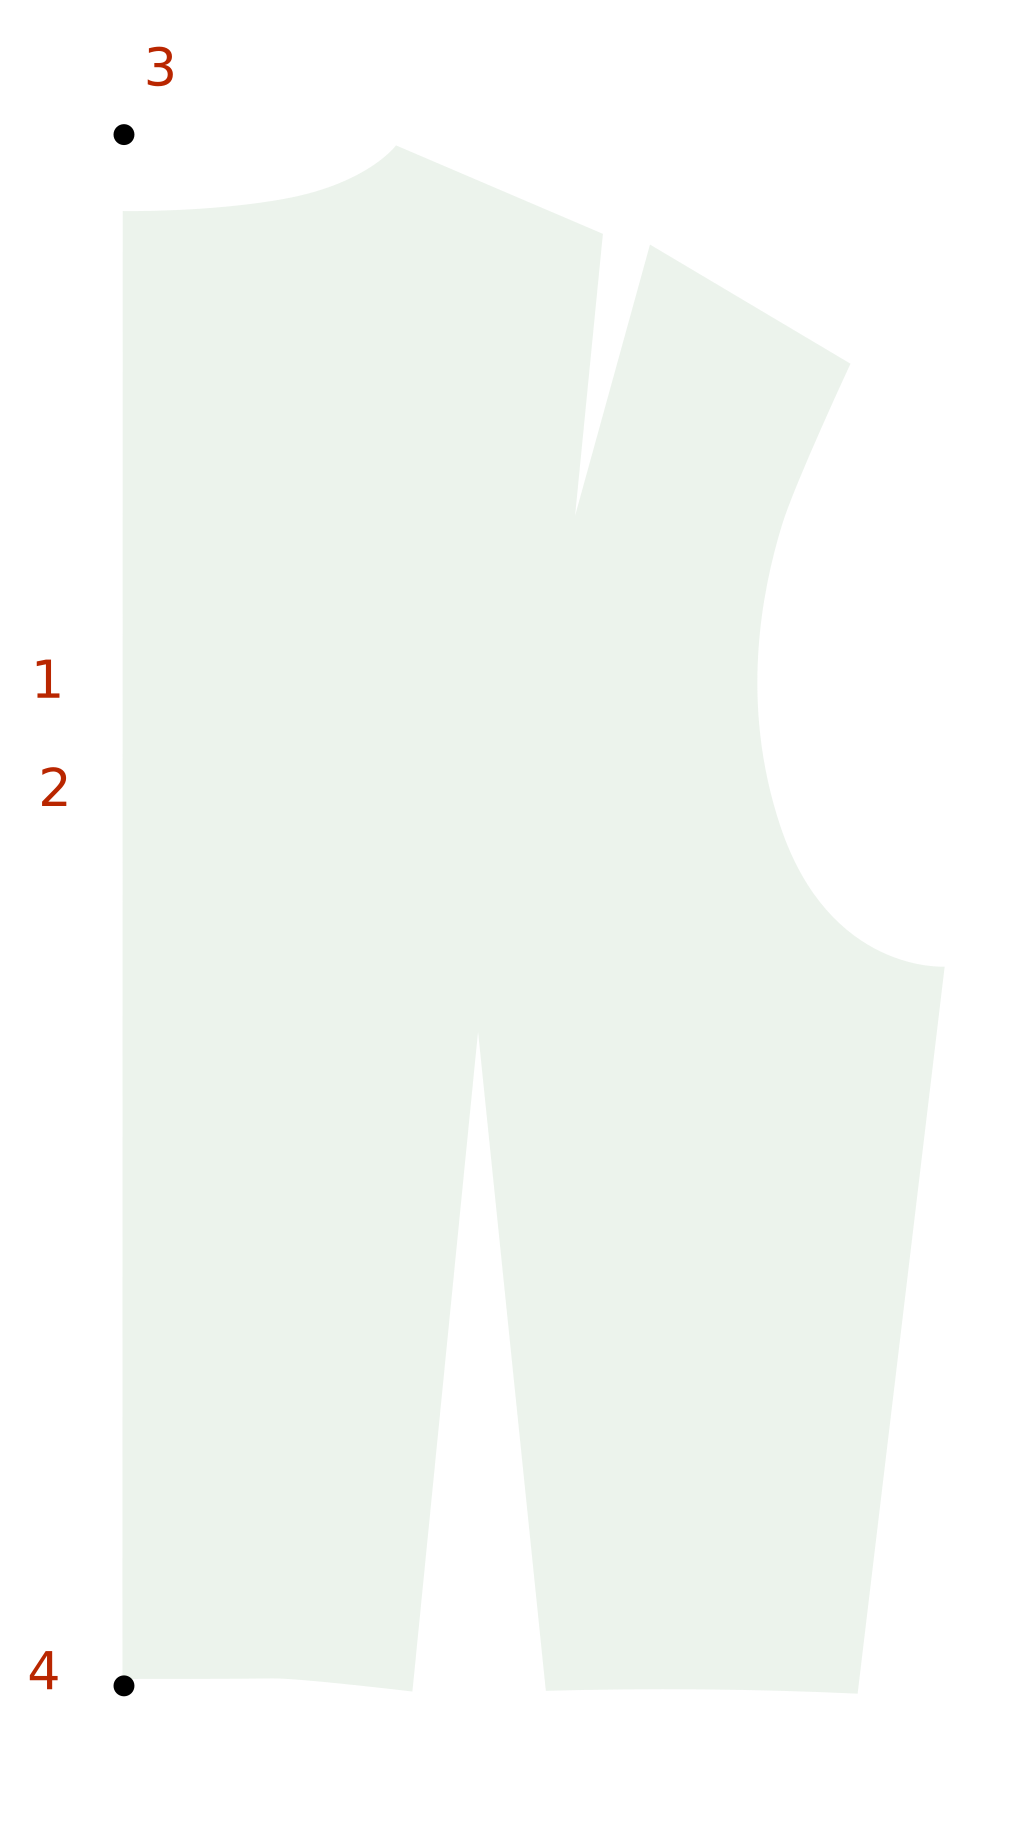
3 Start
This drafts to the right, so place this point to the right of the front pattern.
4 Waist Ctr
Base: 3 Start
Y: {Full Length Back}
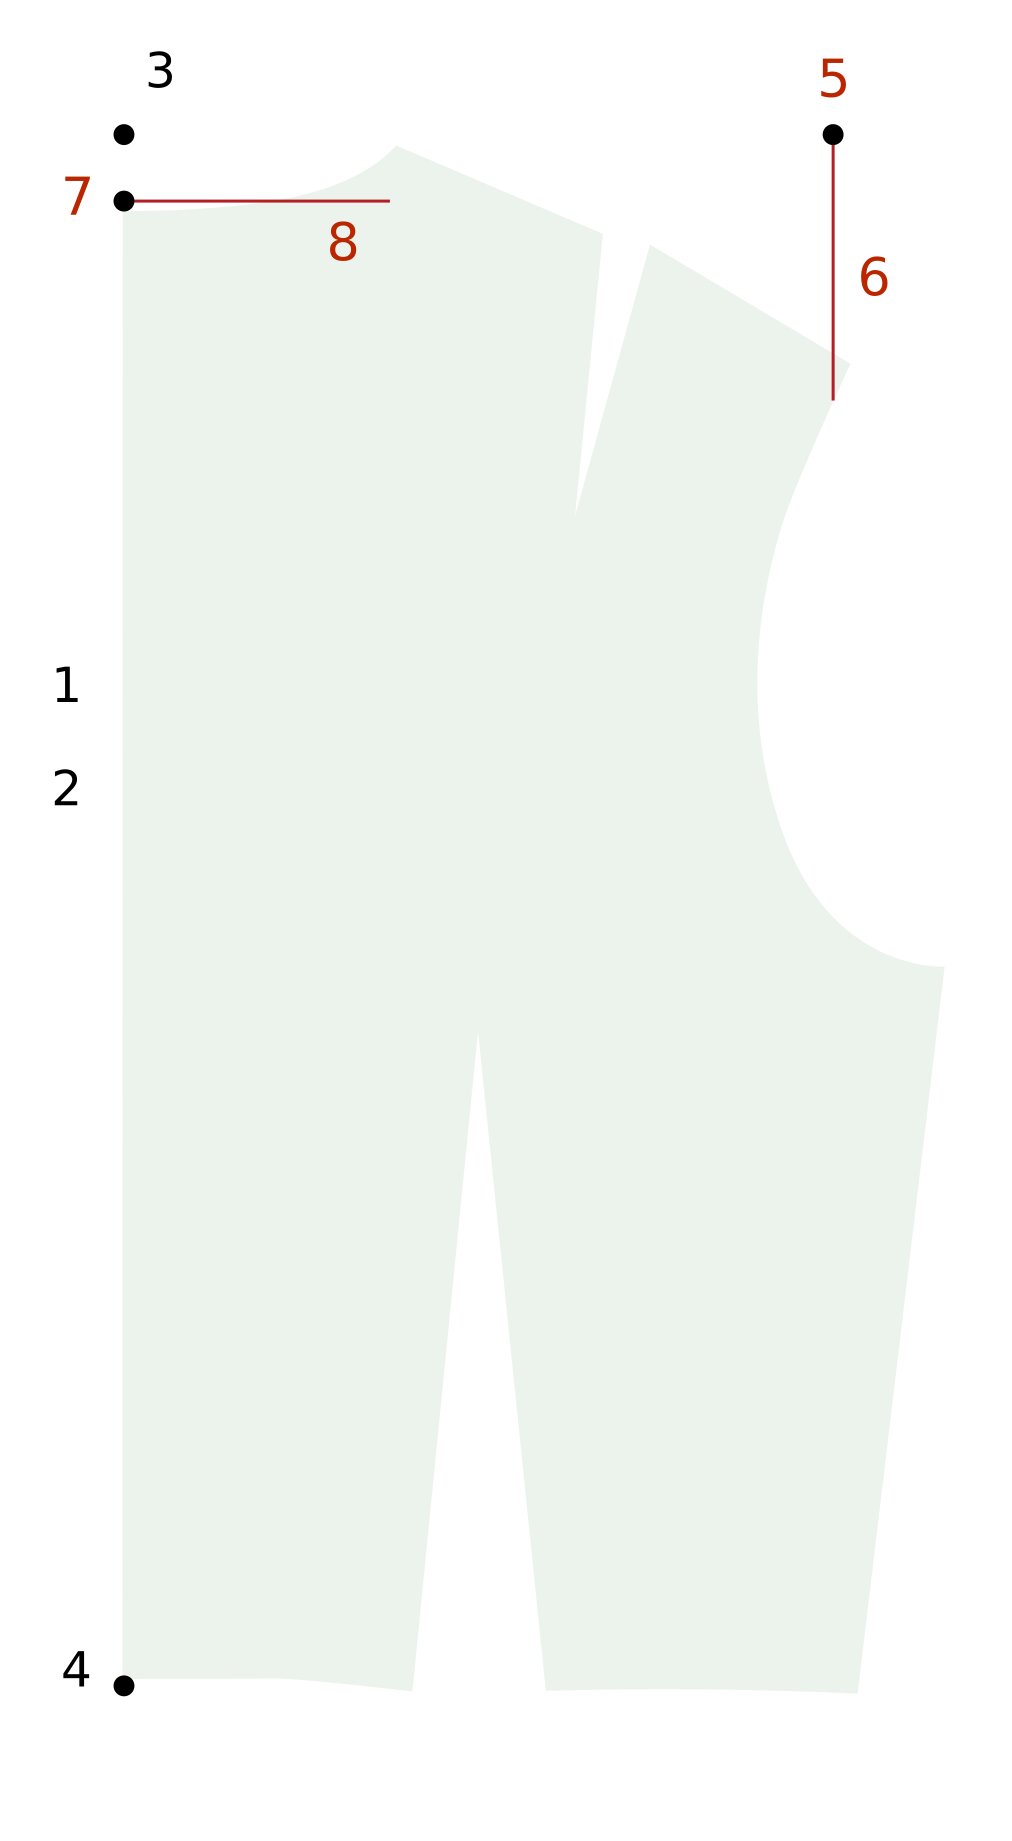
5 Shoulder RP
Base: 3 Start
X: {Shoulder Across Back} / 2
6 Shoulder Ref Line
Start: 5 Shoulder RP
Direction: Vertical
Length: Set Distance 4" or 102 mm goes down
7 Center Neck
Base: 4 Waist Ctr
Y: - {Center Length Back}
8 Neck Ref Line
Start: 7 Center Neck
Direction: Horizontal
Length: Set Distance 4" or 102 mm goes right
9 Side Waist RP
Base: 4 Waist Ctr
X: ({Bust Back} / 2) + 0.75" or 19 mm
10 Side Neck
Base: 3 Start
X: ({Neck Back} / 2) + 0.125" or 3 mm
11 Shoulder Tip RP
From: 4 Waist Ctr
Distance: {Shoulder Slope Back} + 0.125" or 3 mm
Line: 6 Shoulder Ref Line
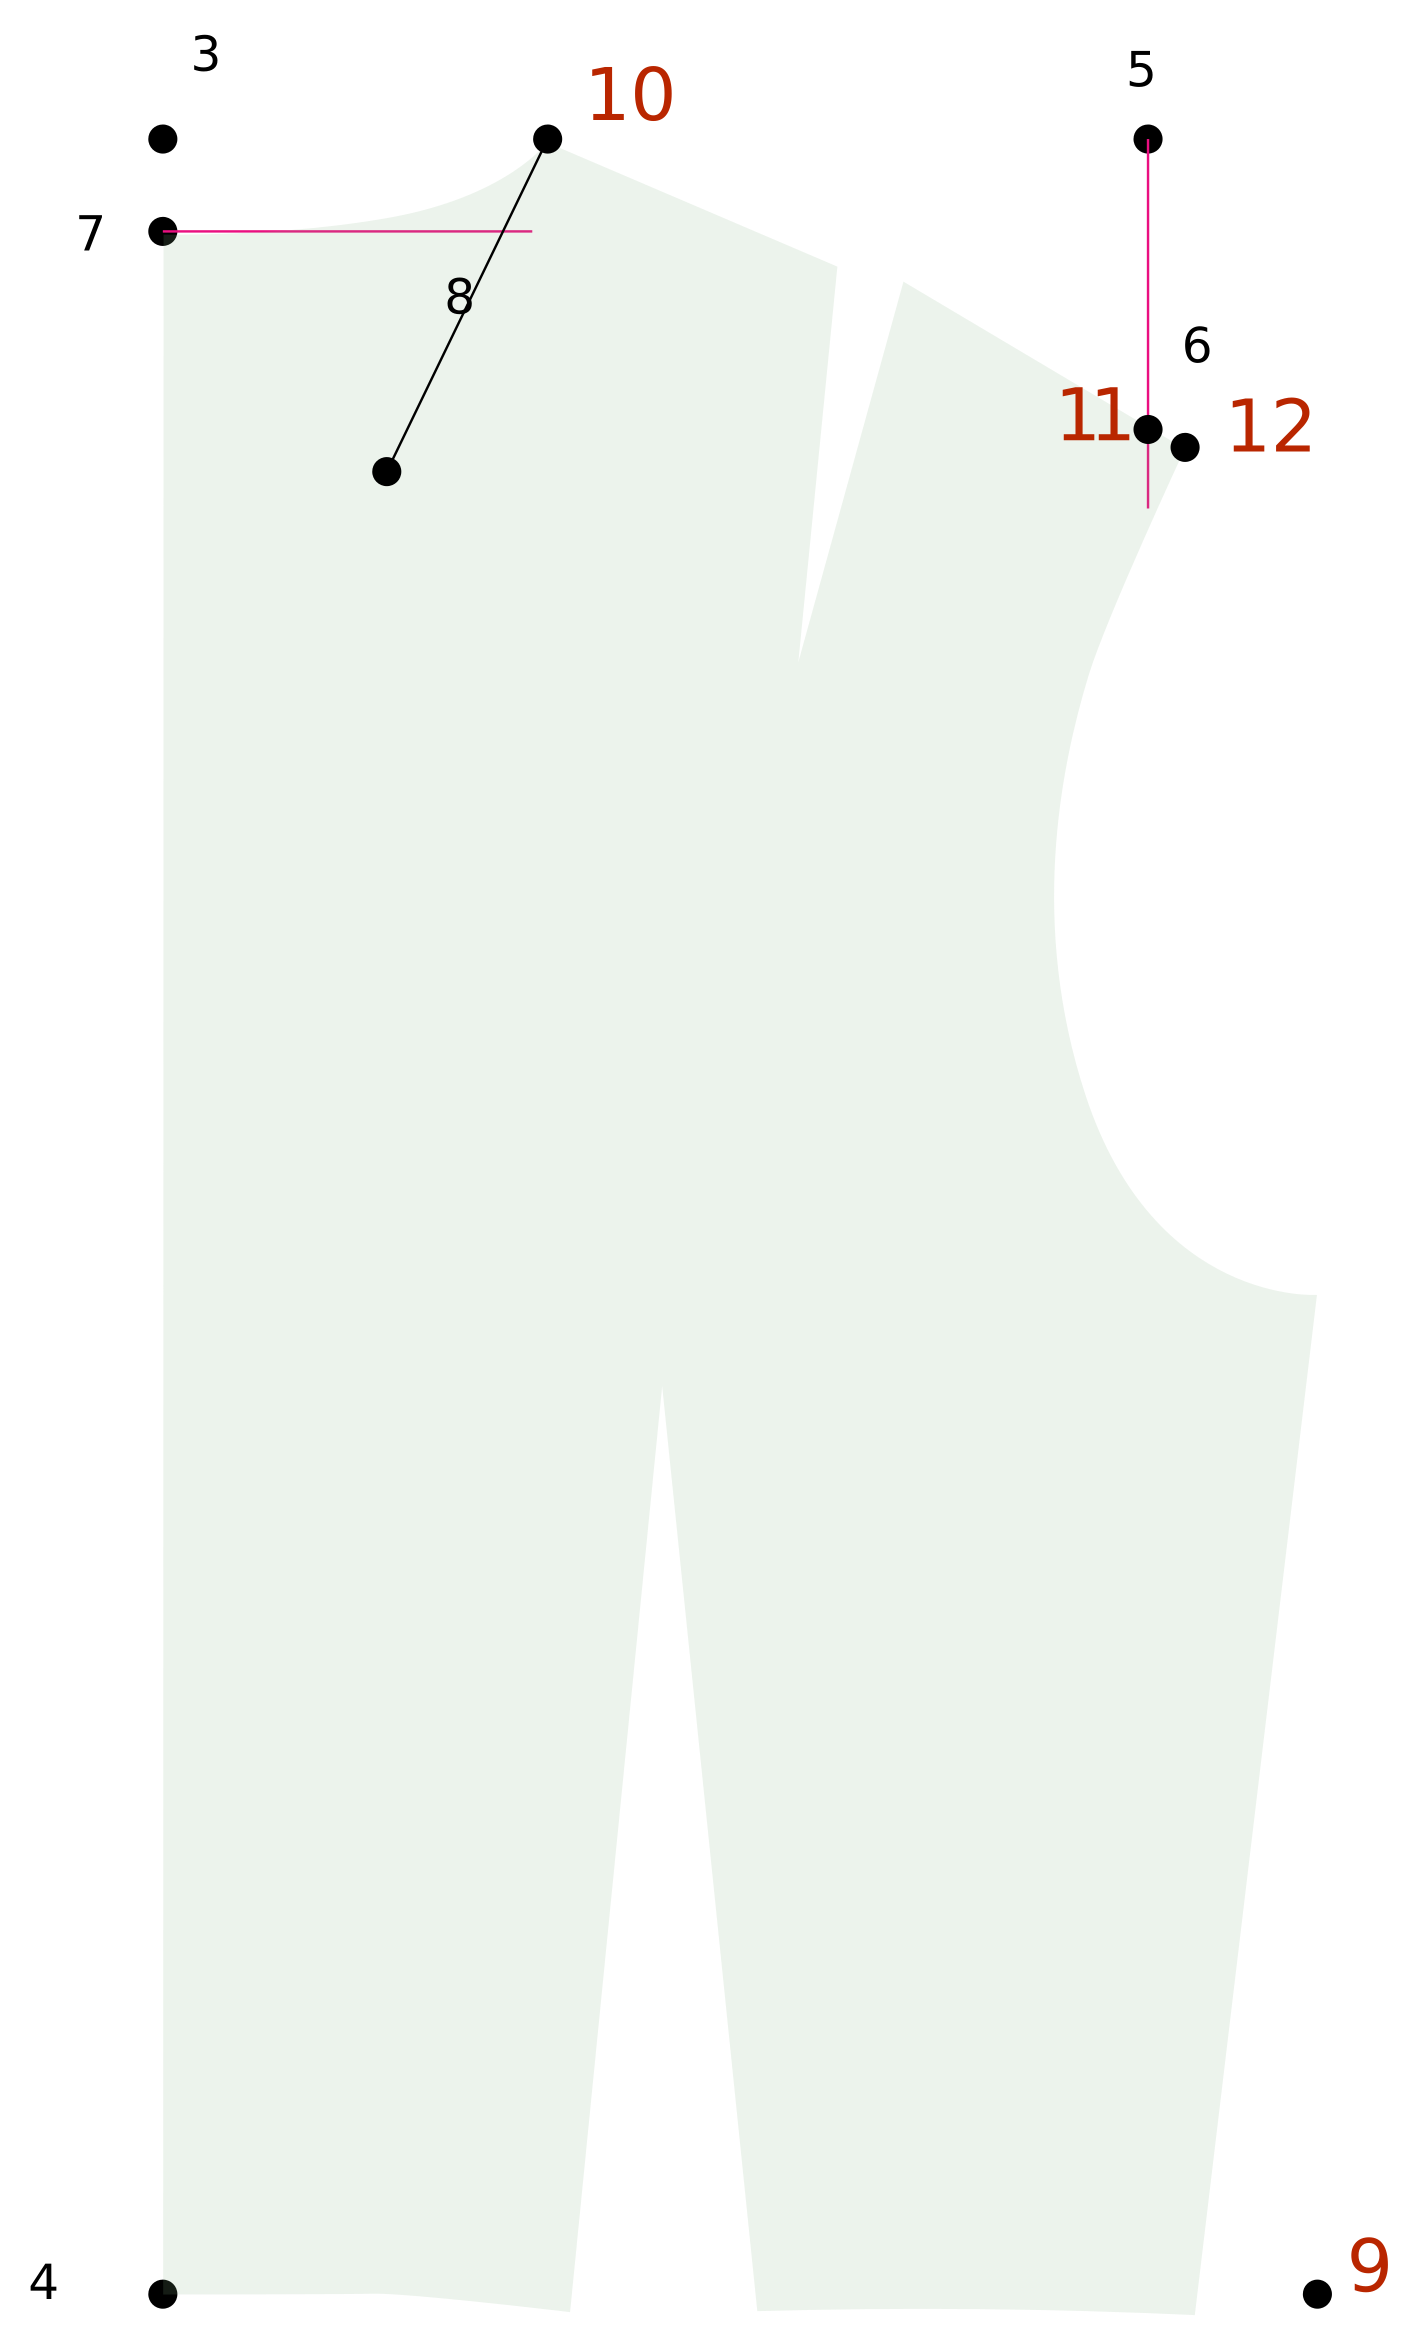
12 Shoulder Tip
Start: 10 Side Neck
Vector: 11 Shoulder Tip RP
Distance: {Shoulder Length} + 0.5" or 13 mm
13 Neckline RP
Origin: 10 Side Neck
Vector: 11 Shoulder Tip RP
Distance: 3" or 76 mm
Save & Line
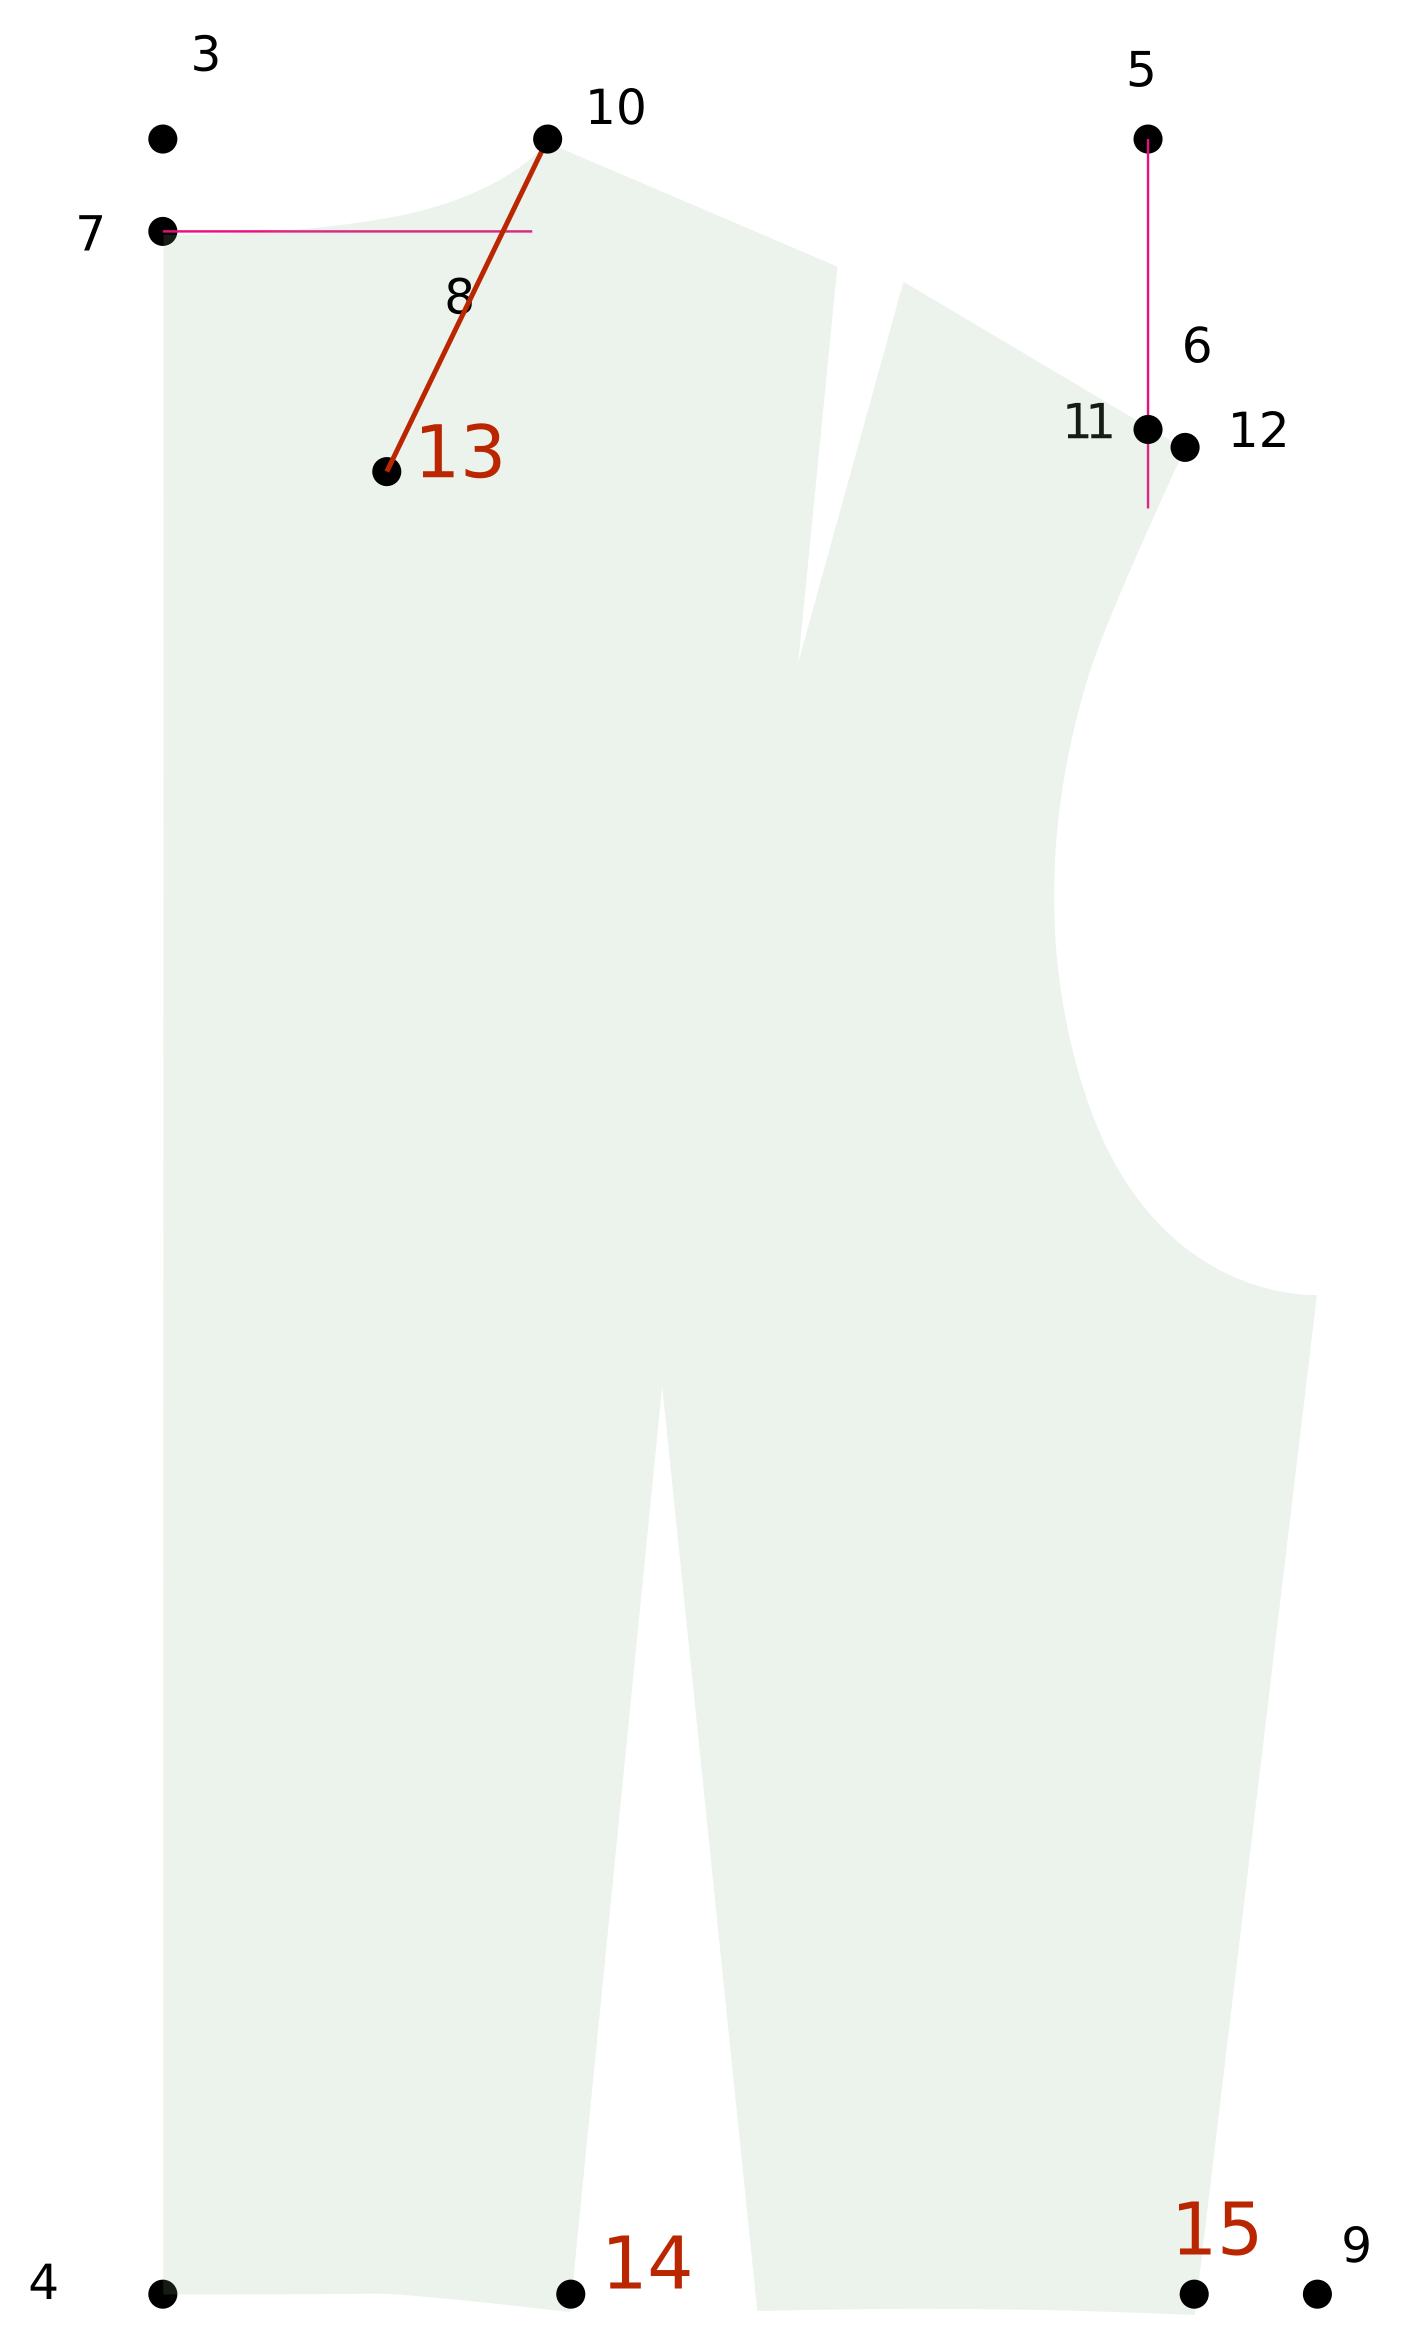
14 Dart Leg RP
Base: 4 Waist Ctr
X: {Waist Back} / 4
15 Side Waist RP 2
Base: 4 Waist Ctr
X: ({Waist Back} / 2) + 1.5" or 38 mm + 0.25" or 6 mm
1.5" (38 mm) is dart intake and 0.25" (6 mm) addition is ease. See page 2 regarding dart intake values.
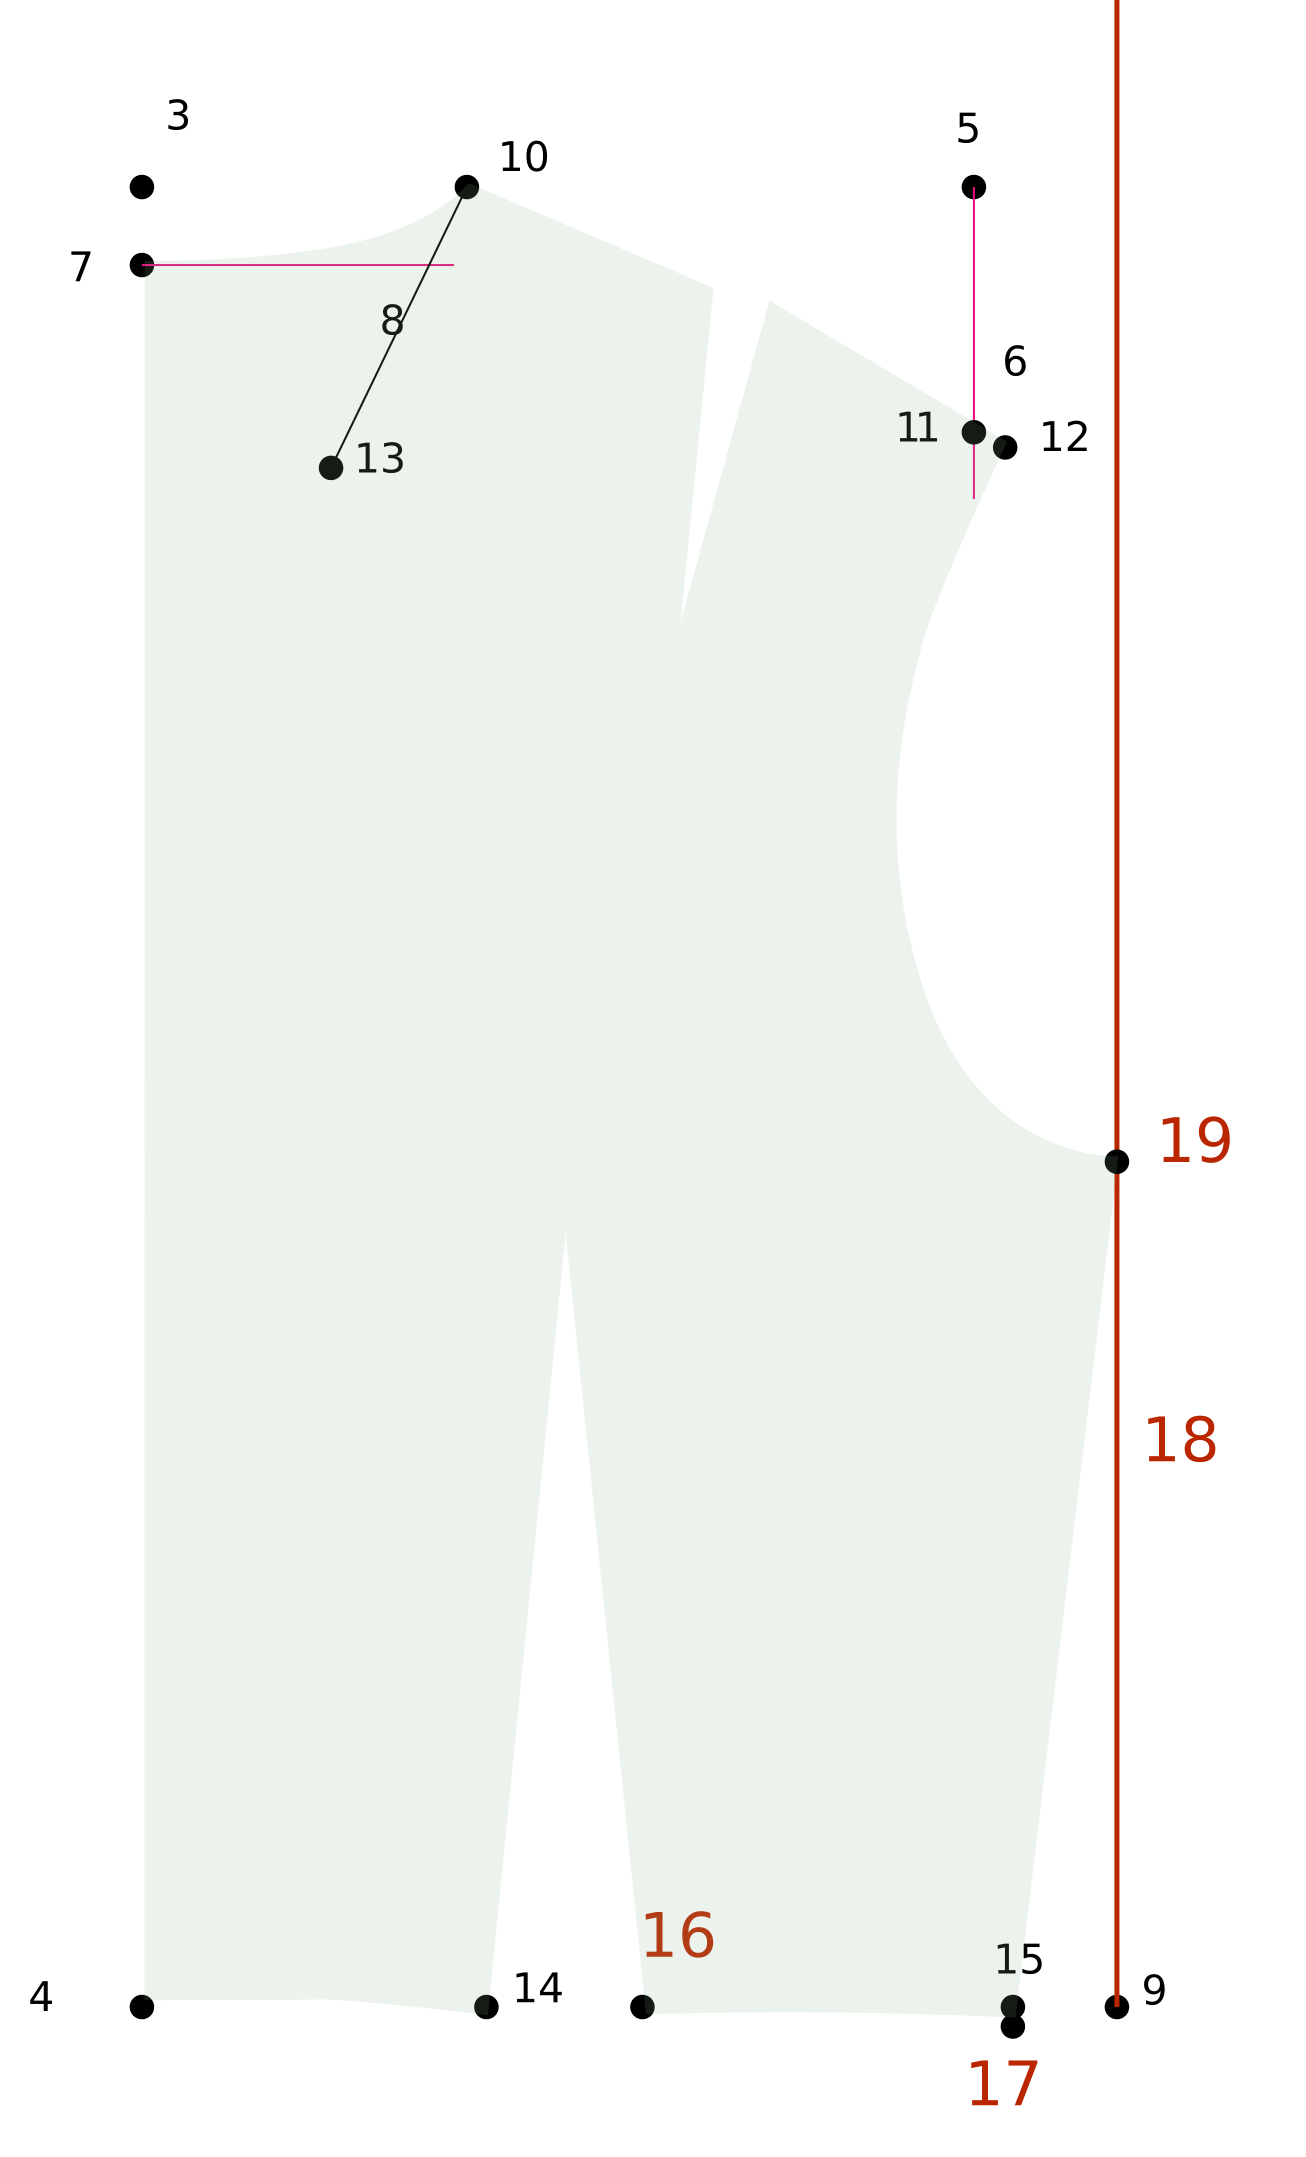
16 Dart Leg RP
Base: 14 Dart Leg RP
X: 1.5" or 38 mm
Value must match step 15 dart intake.
17 Side Waist
Base: 15 Side Waist RP 2
Y: 0.1875 or 5 mm
18 Side Ref Line
Start: 9 Side Waist RP
Direction: Vertical
Length: One direction (up)
19 Armpit
From: 17 Side Waist
Distance: {Side Length}
Line: 18 Side Ref Line
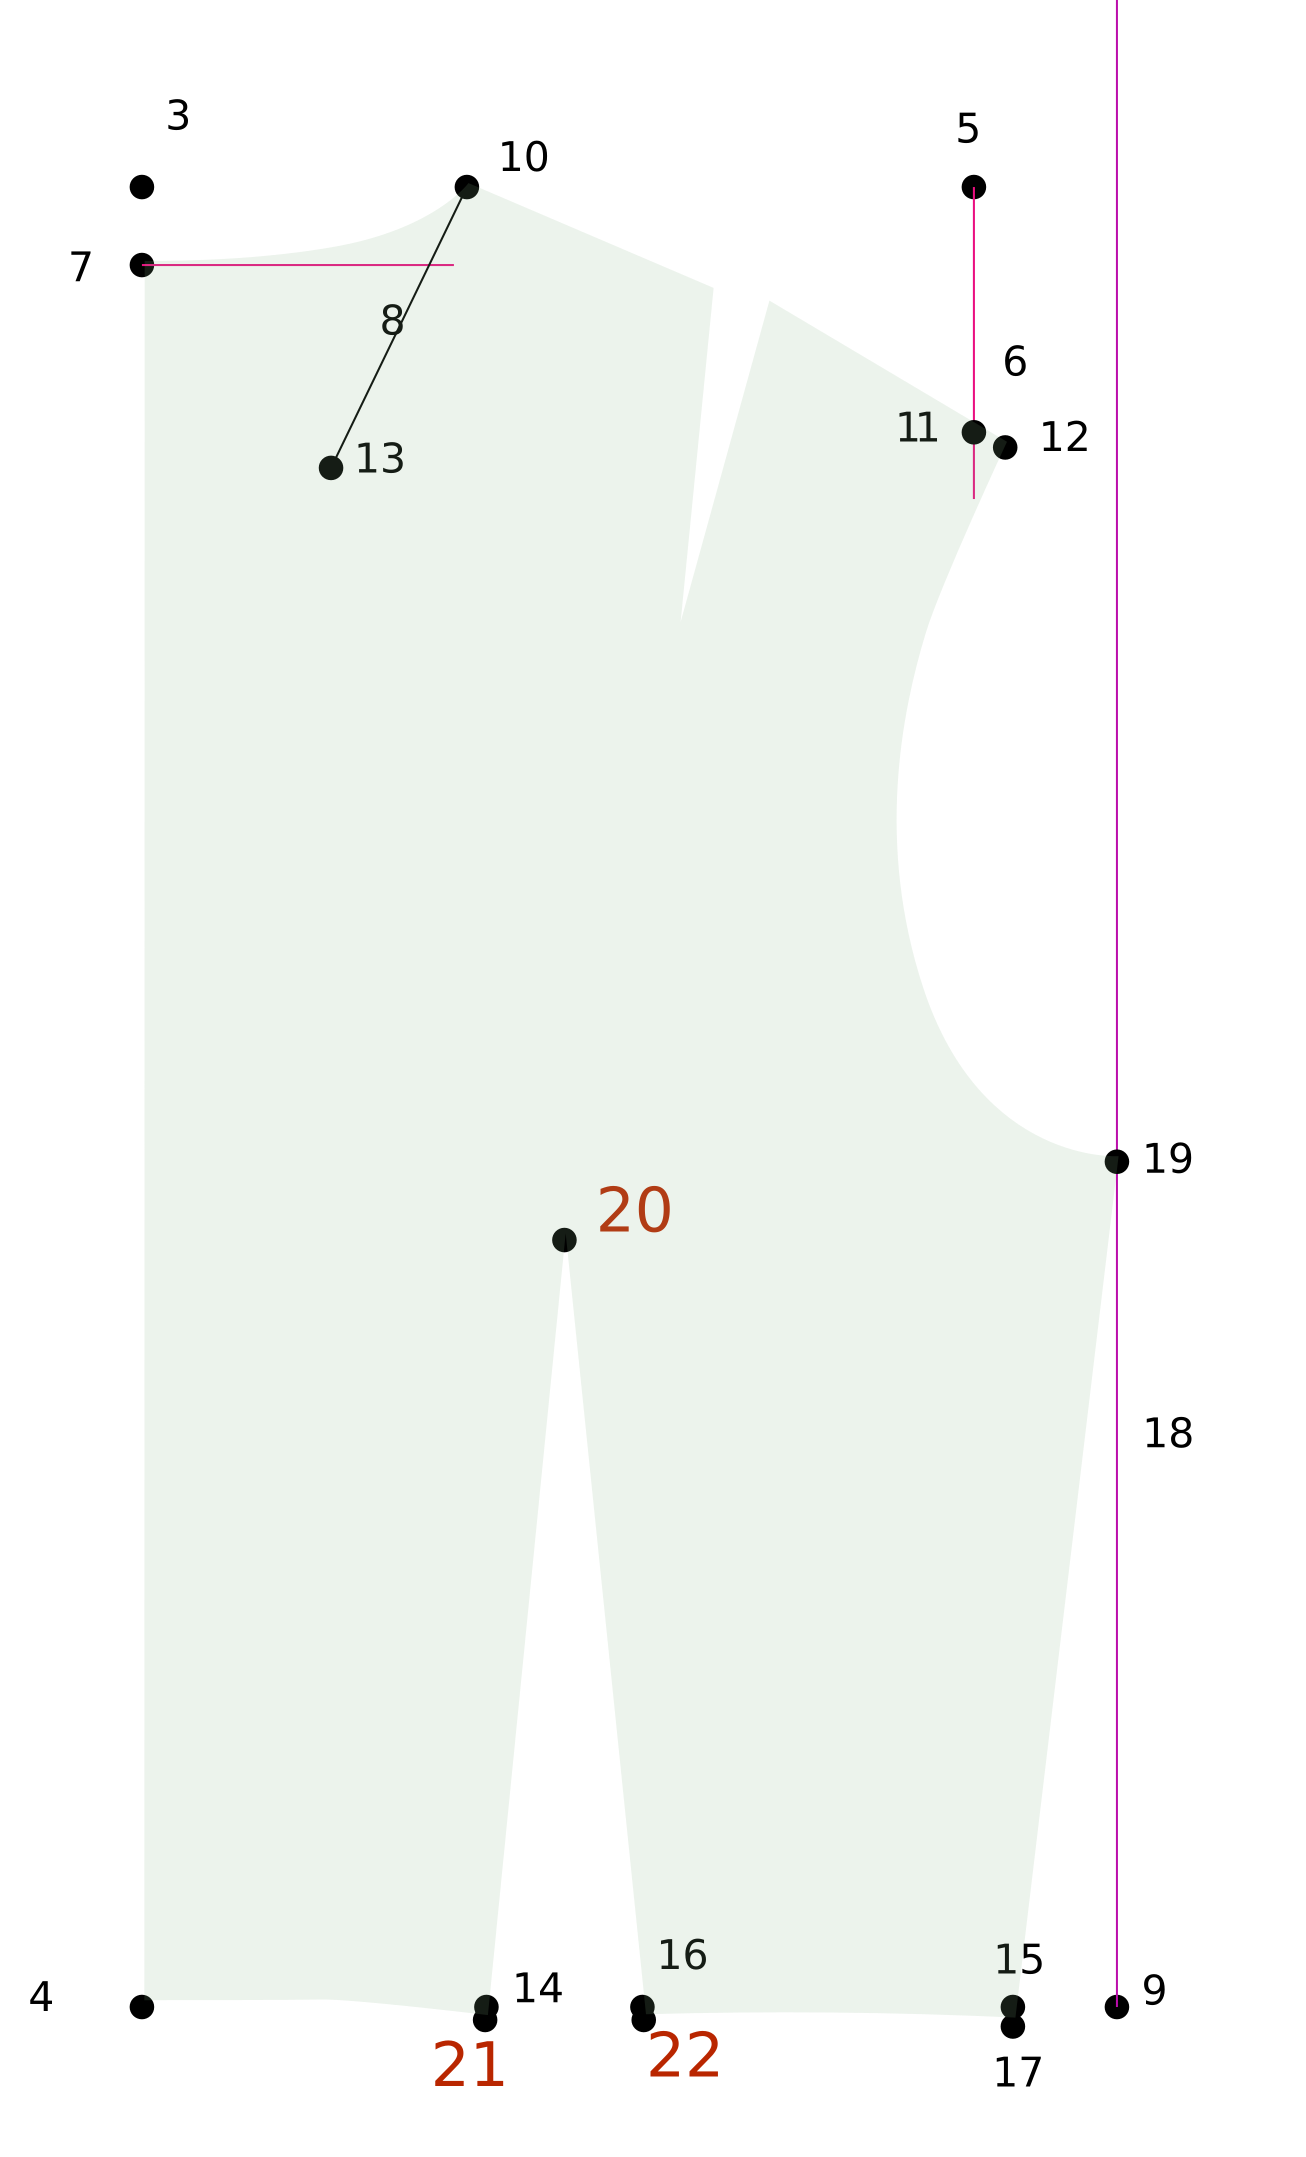
20 Waist Apex
14 Dart Leg RP16 Dart Leg RP
X: Center
Y: Center
Adjust Y: - ({Side Length} - 1" or 25 mm)
21 Waist Dart Leg 1
Start: 14 Dart Leg RP
Vector: 20 Waist Apex
Distance: 0.125" or 3 mm
Make sure point drops below 14 Dart Leg RP
22 Waist Dart Leg 2
Start: 16 Dart Leg RP
Vector: 20 Waist Apex
Distance: 0.125" or 3 mm
Make sure point drops below 16 Dart Leg RP
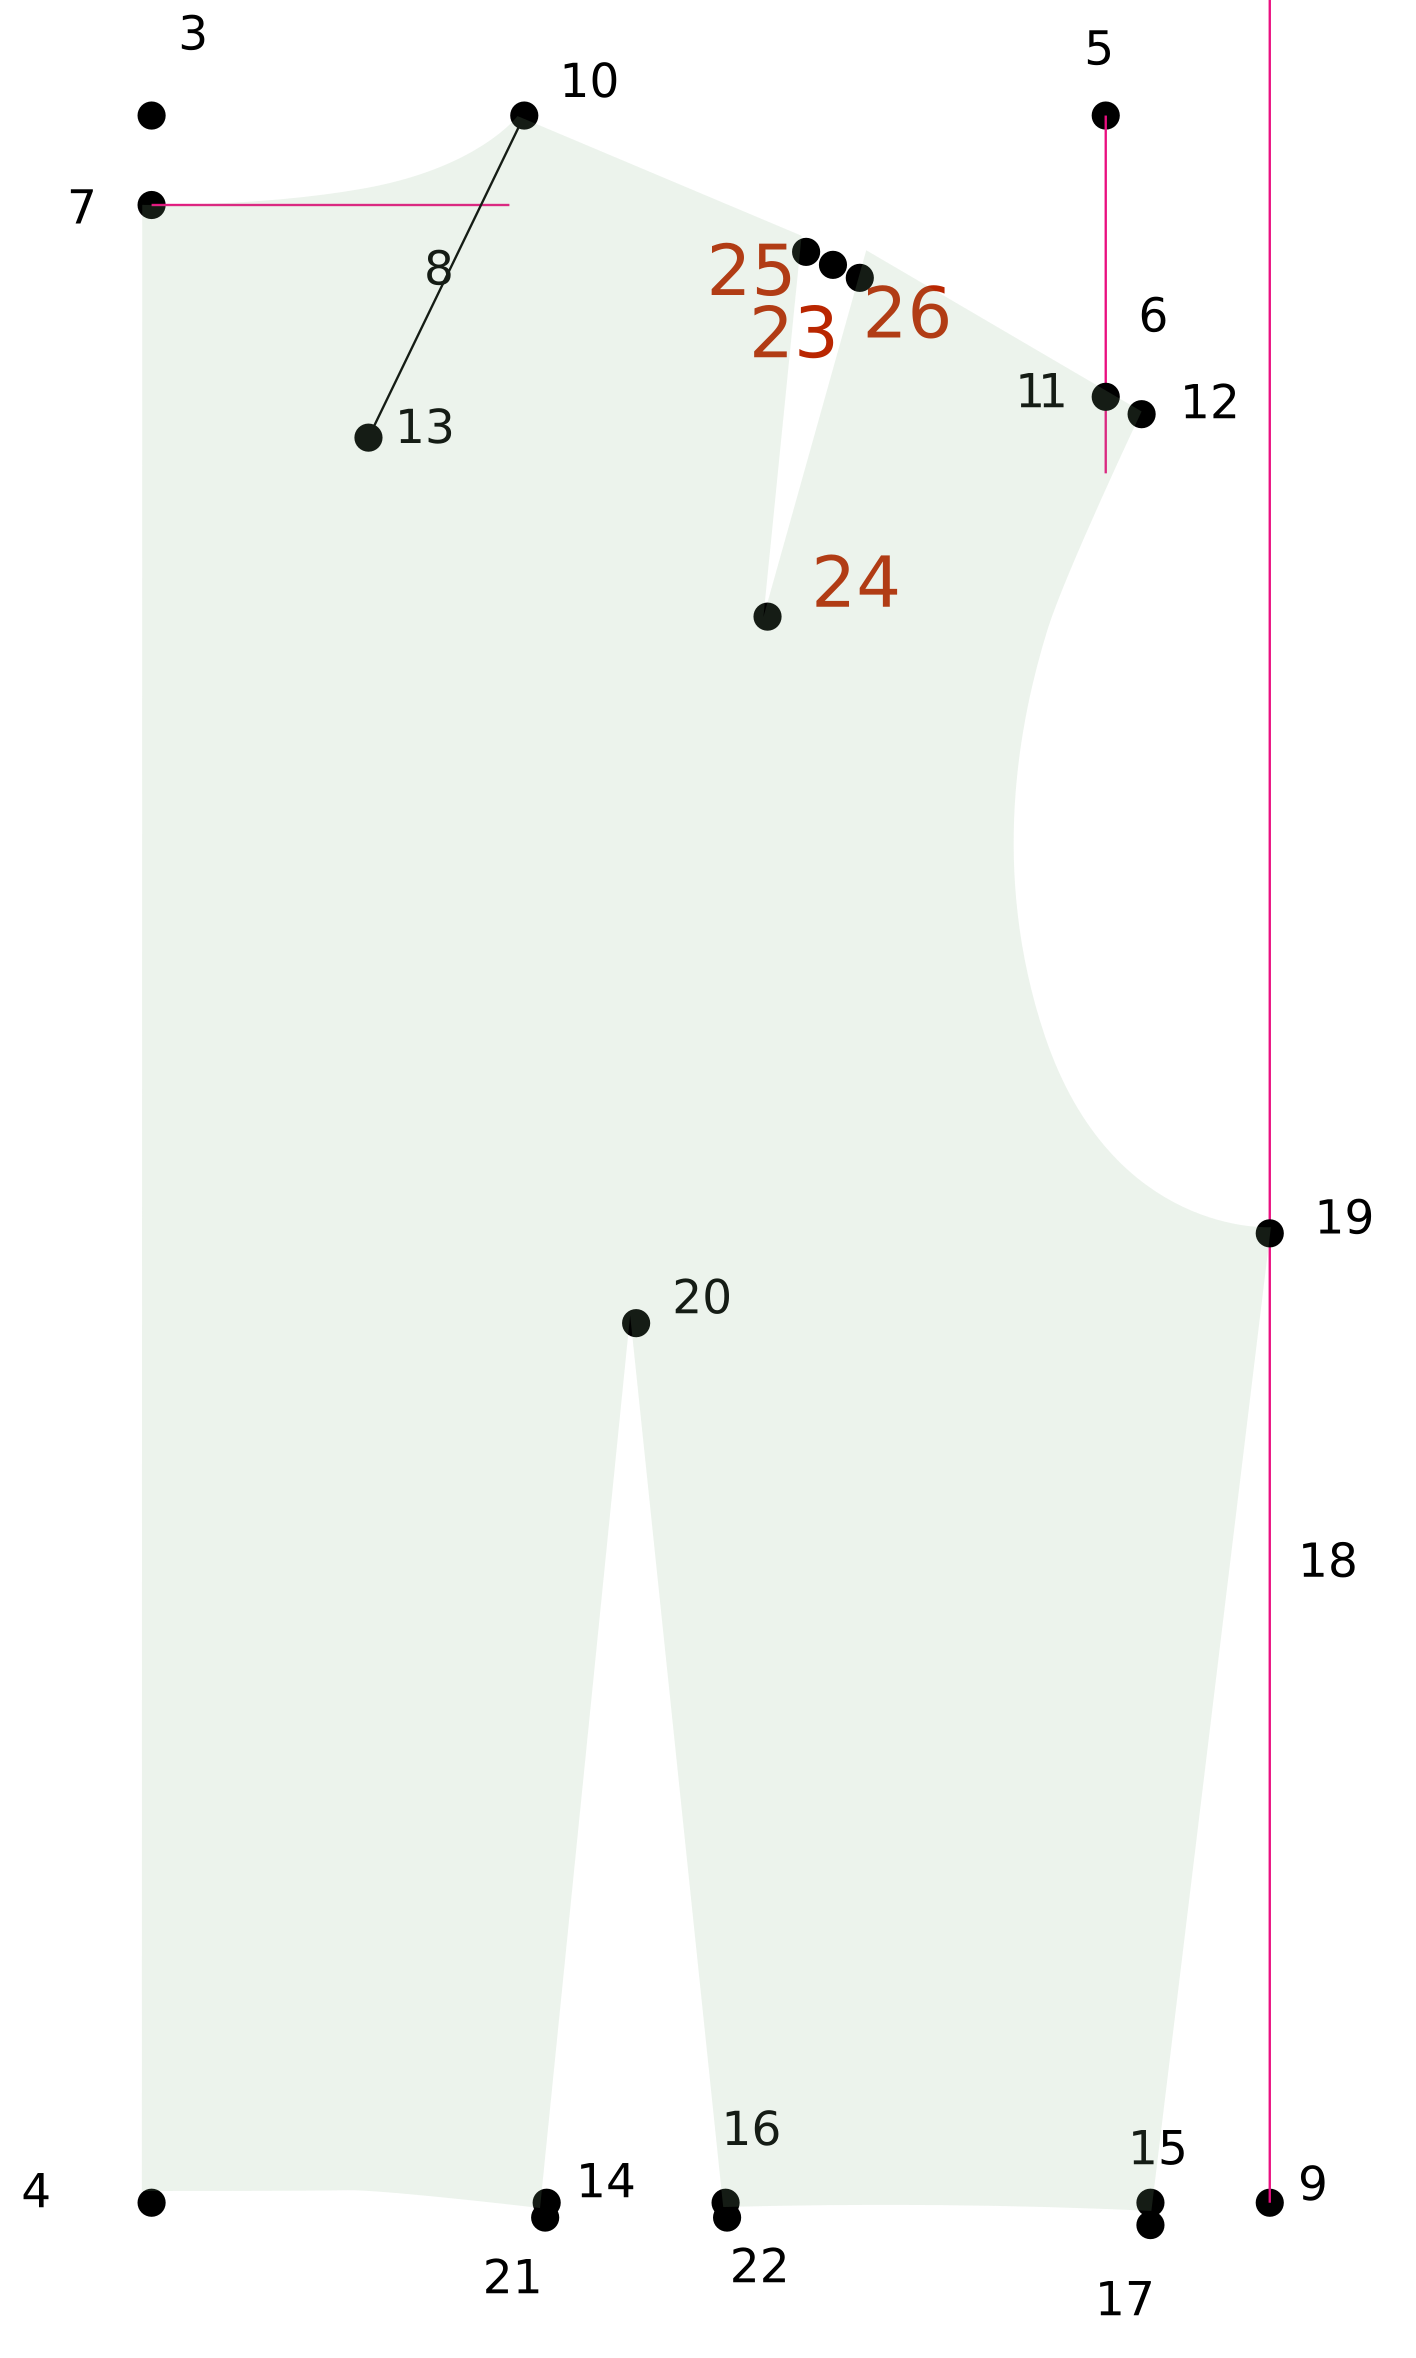
23 Center RP
10 Side Neck12 Shoulder Tip
X: Center
Y: Center
24 Shoulder Apex
Start: 23 Center RP
Vector: 20 Waist Apex
Distance: 3" or 76 mm
25 Dart RP
Start: 23 Center RP
Vector: 10 Side Neck
Distance: 0.25" or 6.5 mm
26 Dart RP
Start: 23 Center RP
Vector: 12 Shoulder Tip
Distance: 0.25" or 6.5 mm
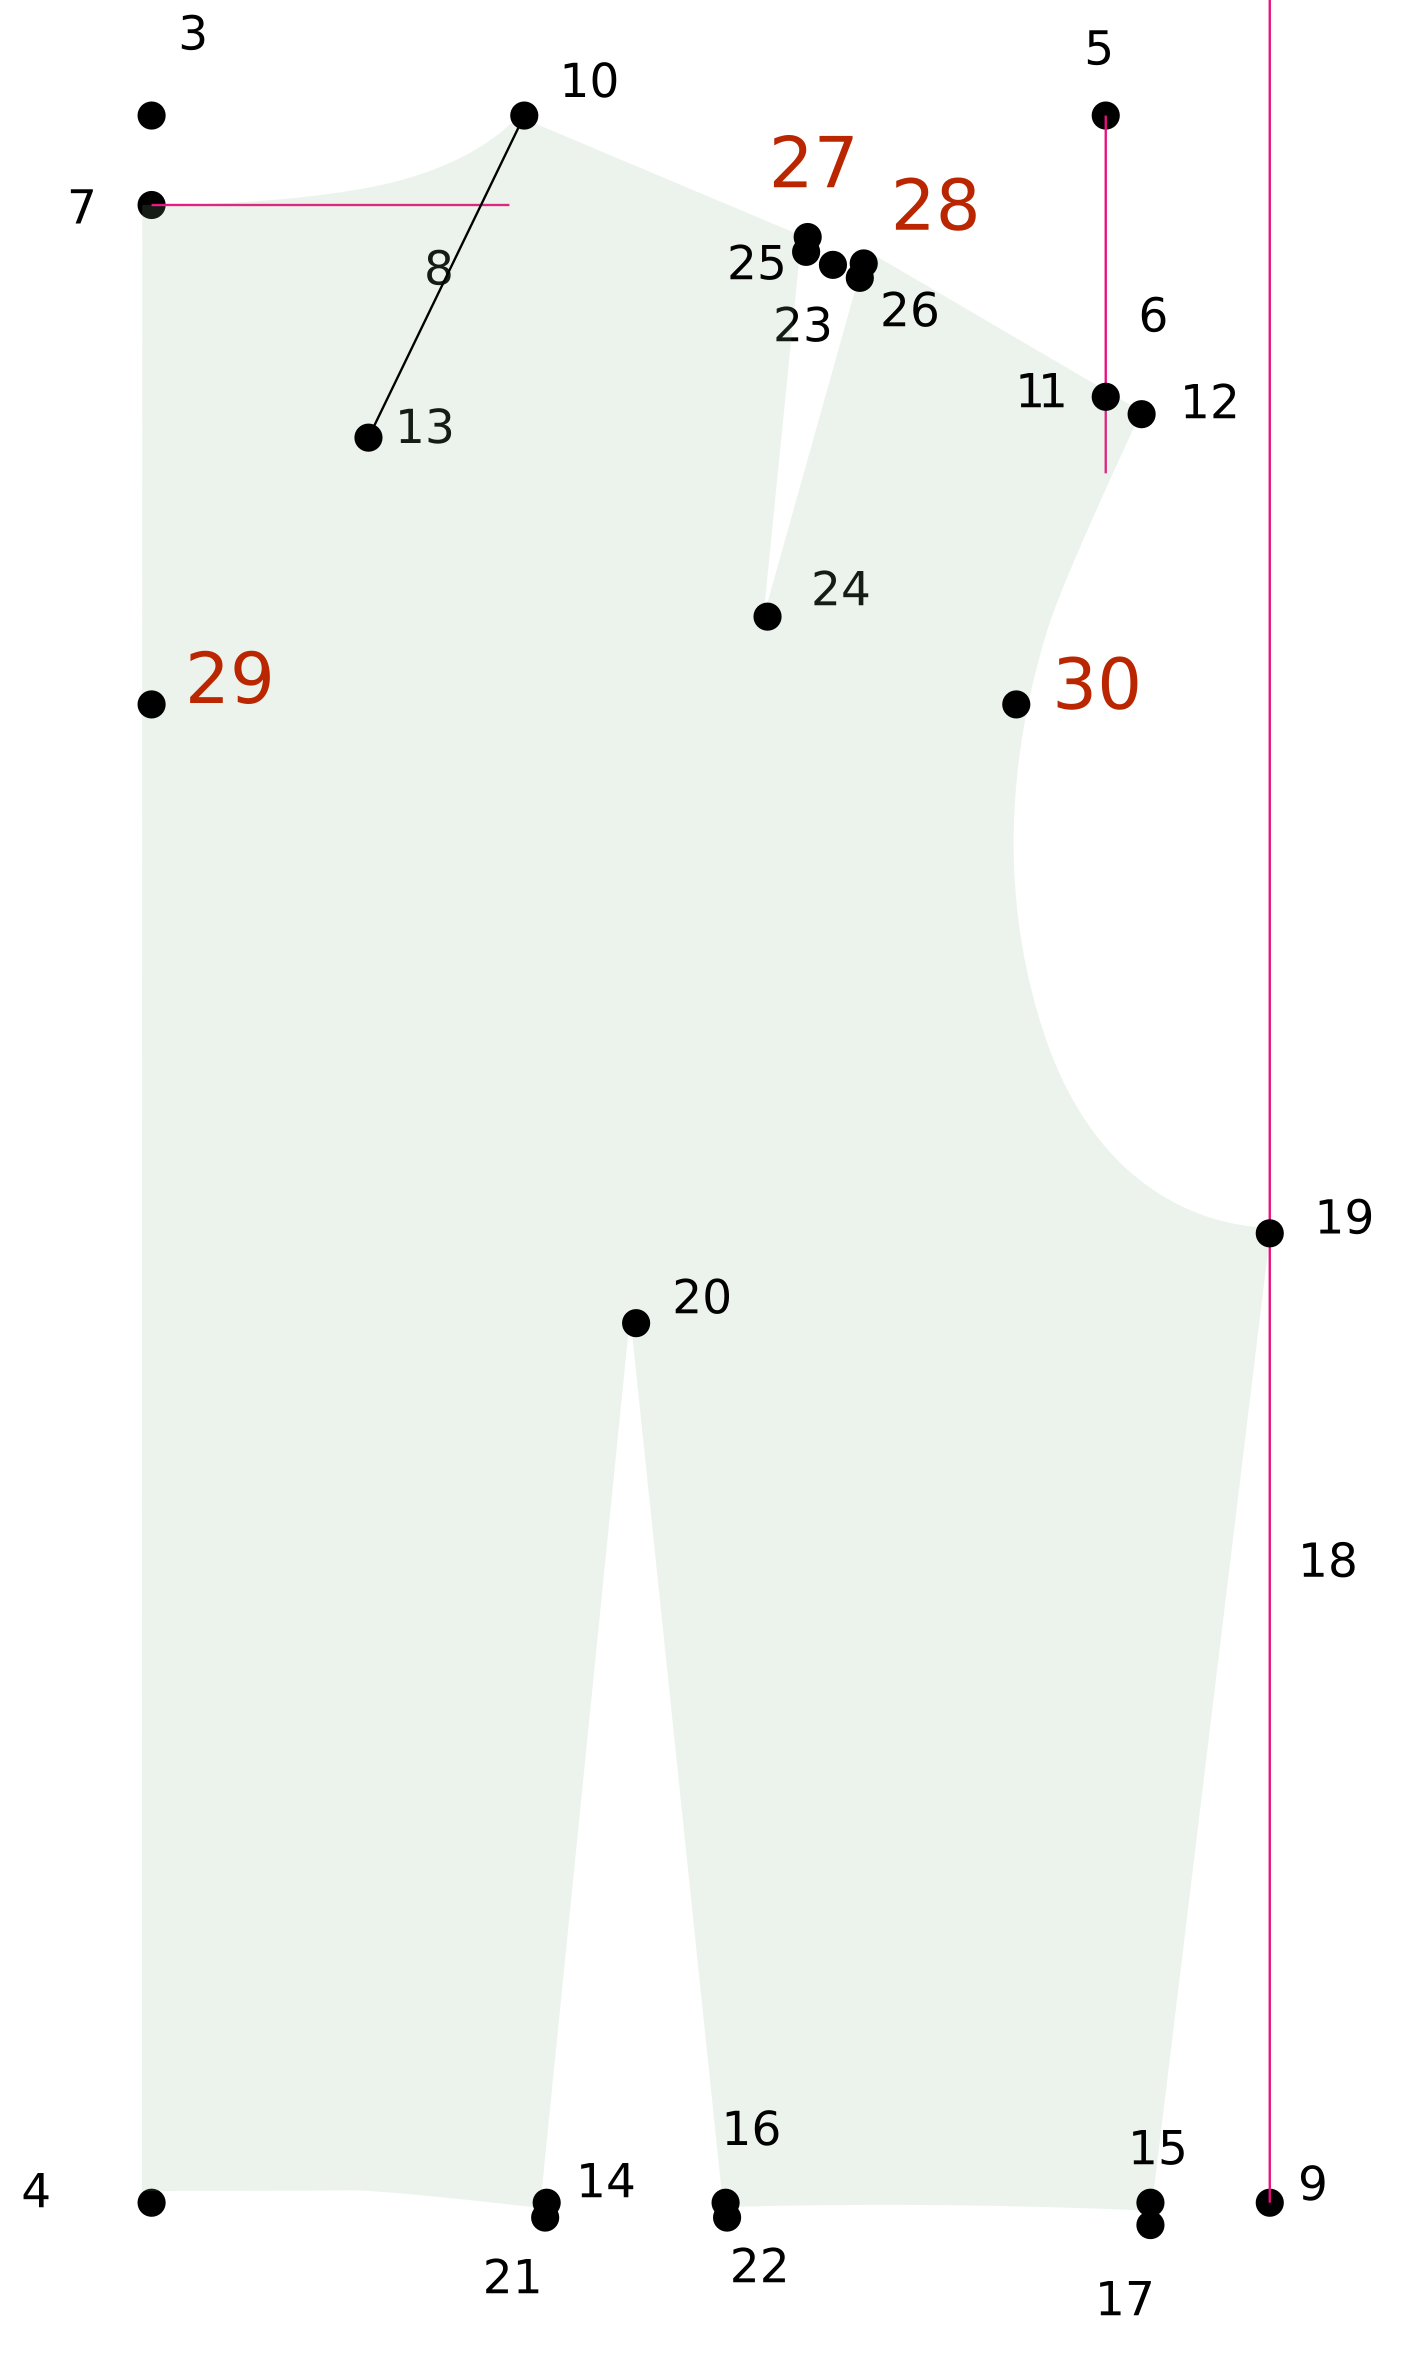
27 Shldr Dart Leg 1
Start: 25 Dart RP
Vector: 24 Shoulder Apex
Distance: 0.125 or 3 mm
Make sure point goes above 25 Dart RP
28 Shldr Dart Leg 2
Start: 26 Dart RP
Vector: 24 Shoulder Apex
Distance: 0.125" or 3 mm
Make sure point goes above 26 Dart RP
29 Across Ht
Base: 7 Center Neck
Y: [Measure 7 Center Neck4 Waist Ctr
30 Across Pt
Base: 29 Across Ht
X: ({Across Back} / 2) + 0.25" or 6 mm
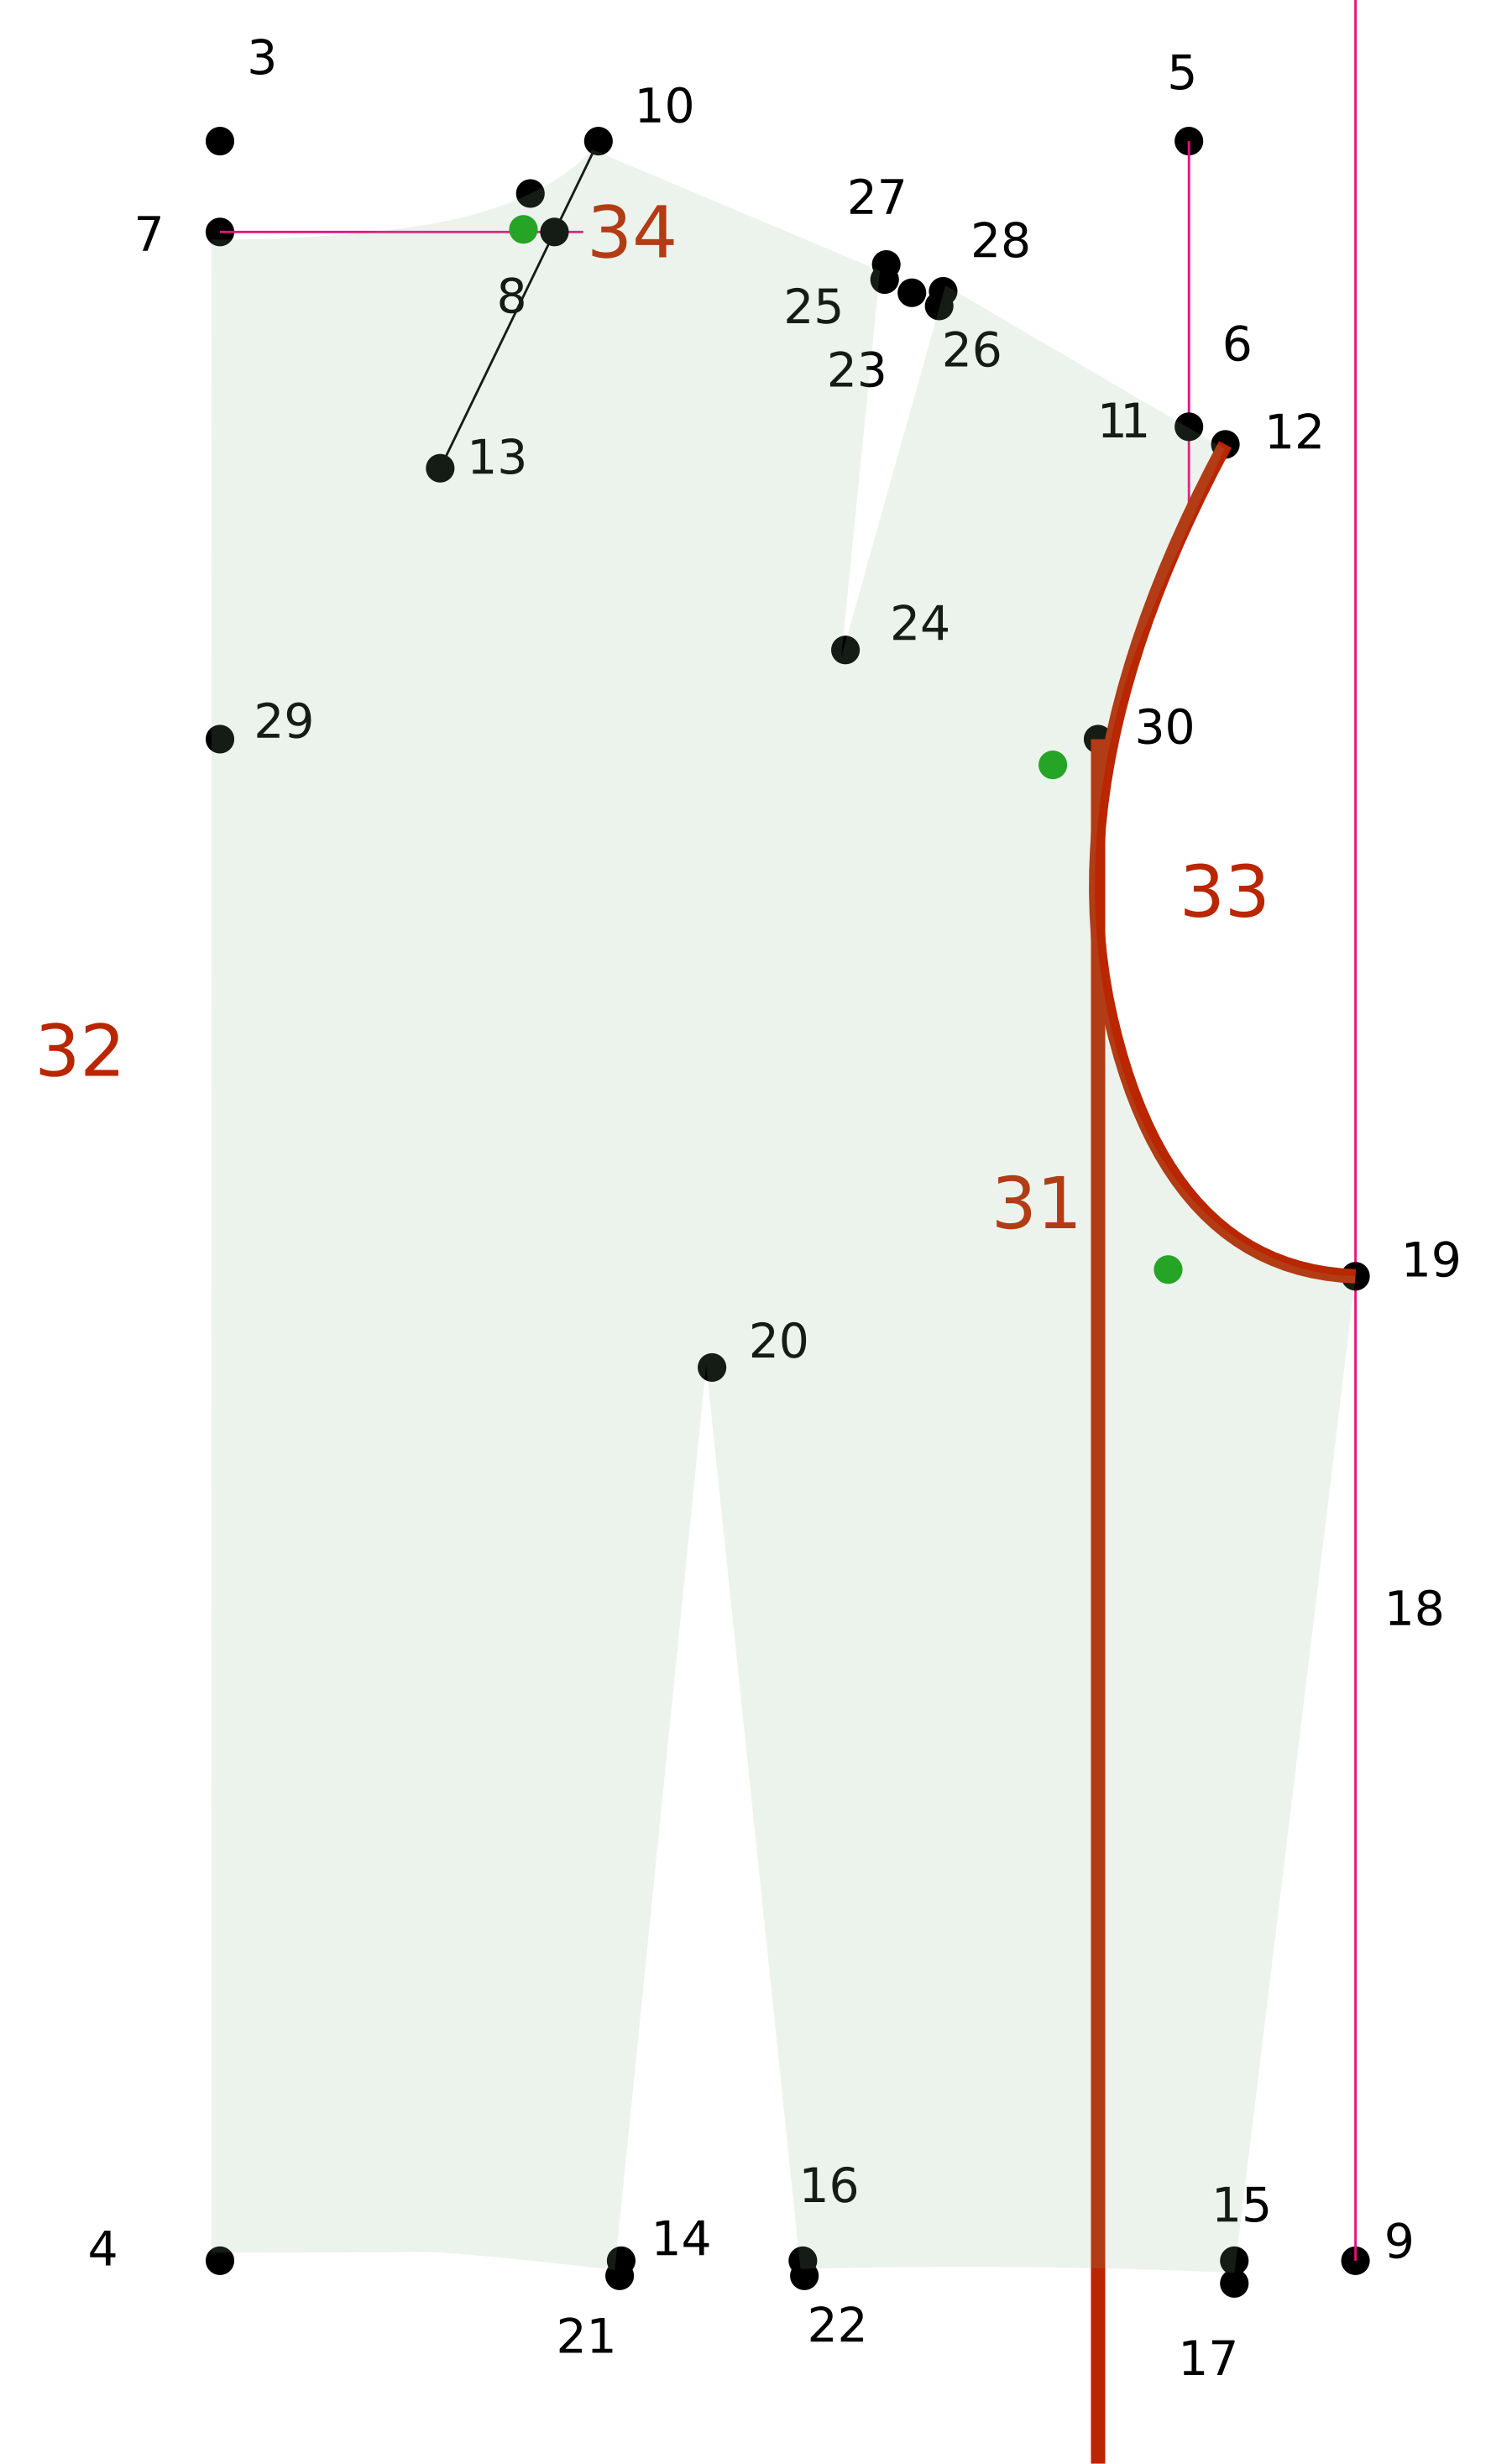
31 Armhole Guide
Start: 30 Across Pt
Direction: Vertical
Length: One direction (down)
32 Outline
Parent: Back Pattern
Name: Outline
Save & Switch
33 Armhole
12 Shoulder Tip19 Armpit
Curve Points: 2
Curve comes over to 30 Across Pt31 Armhole Guide
34 Intersect
13 Neckline RP8 Neck Ref Line
Save
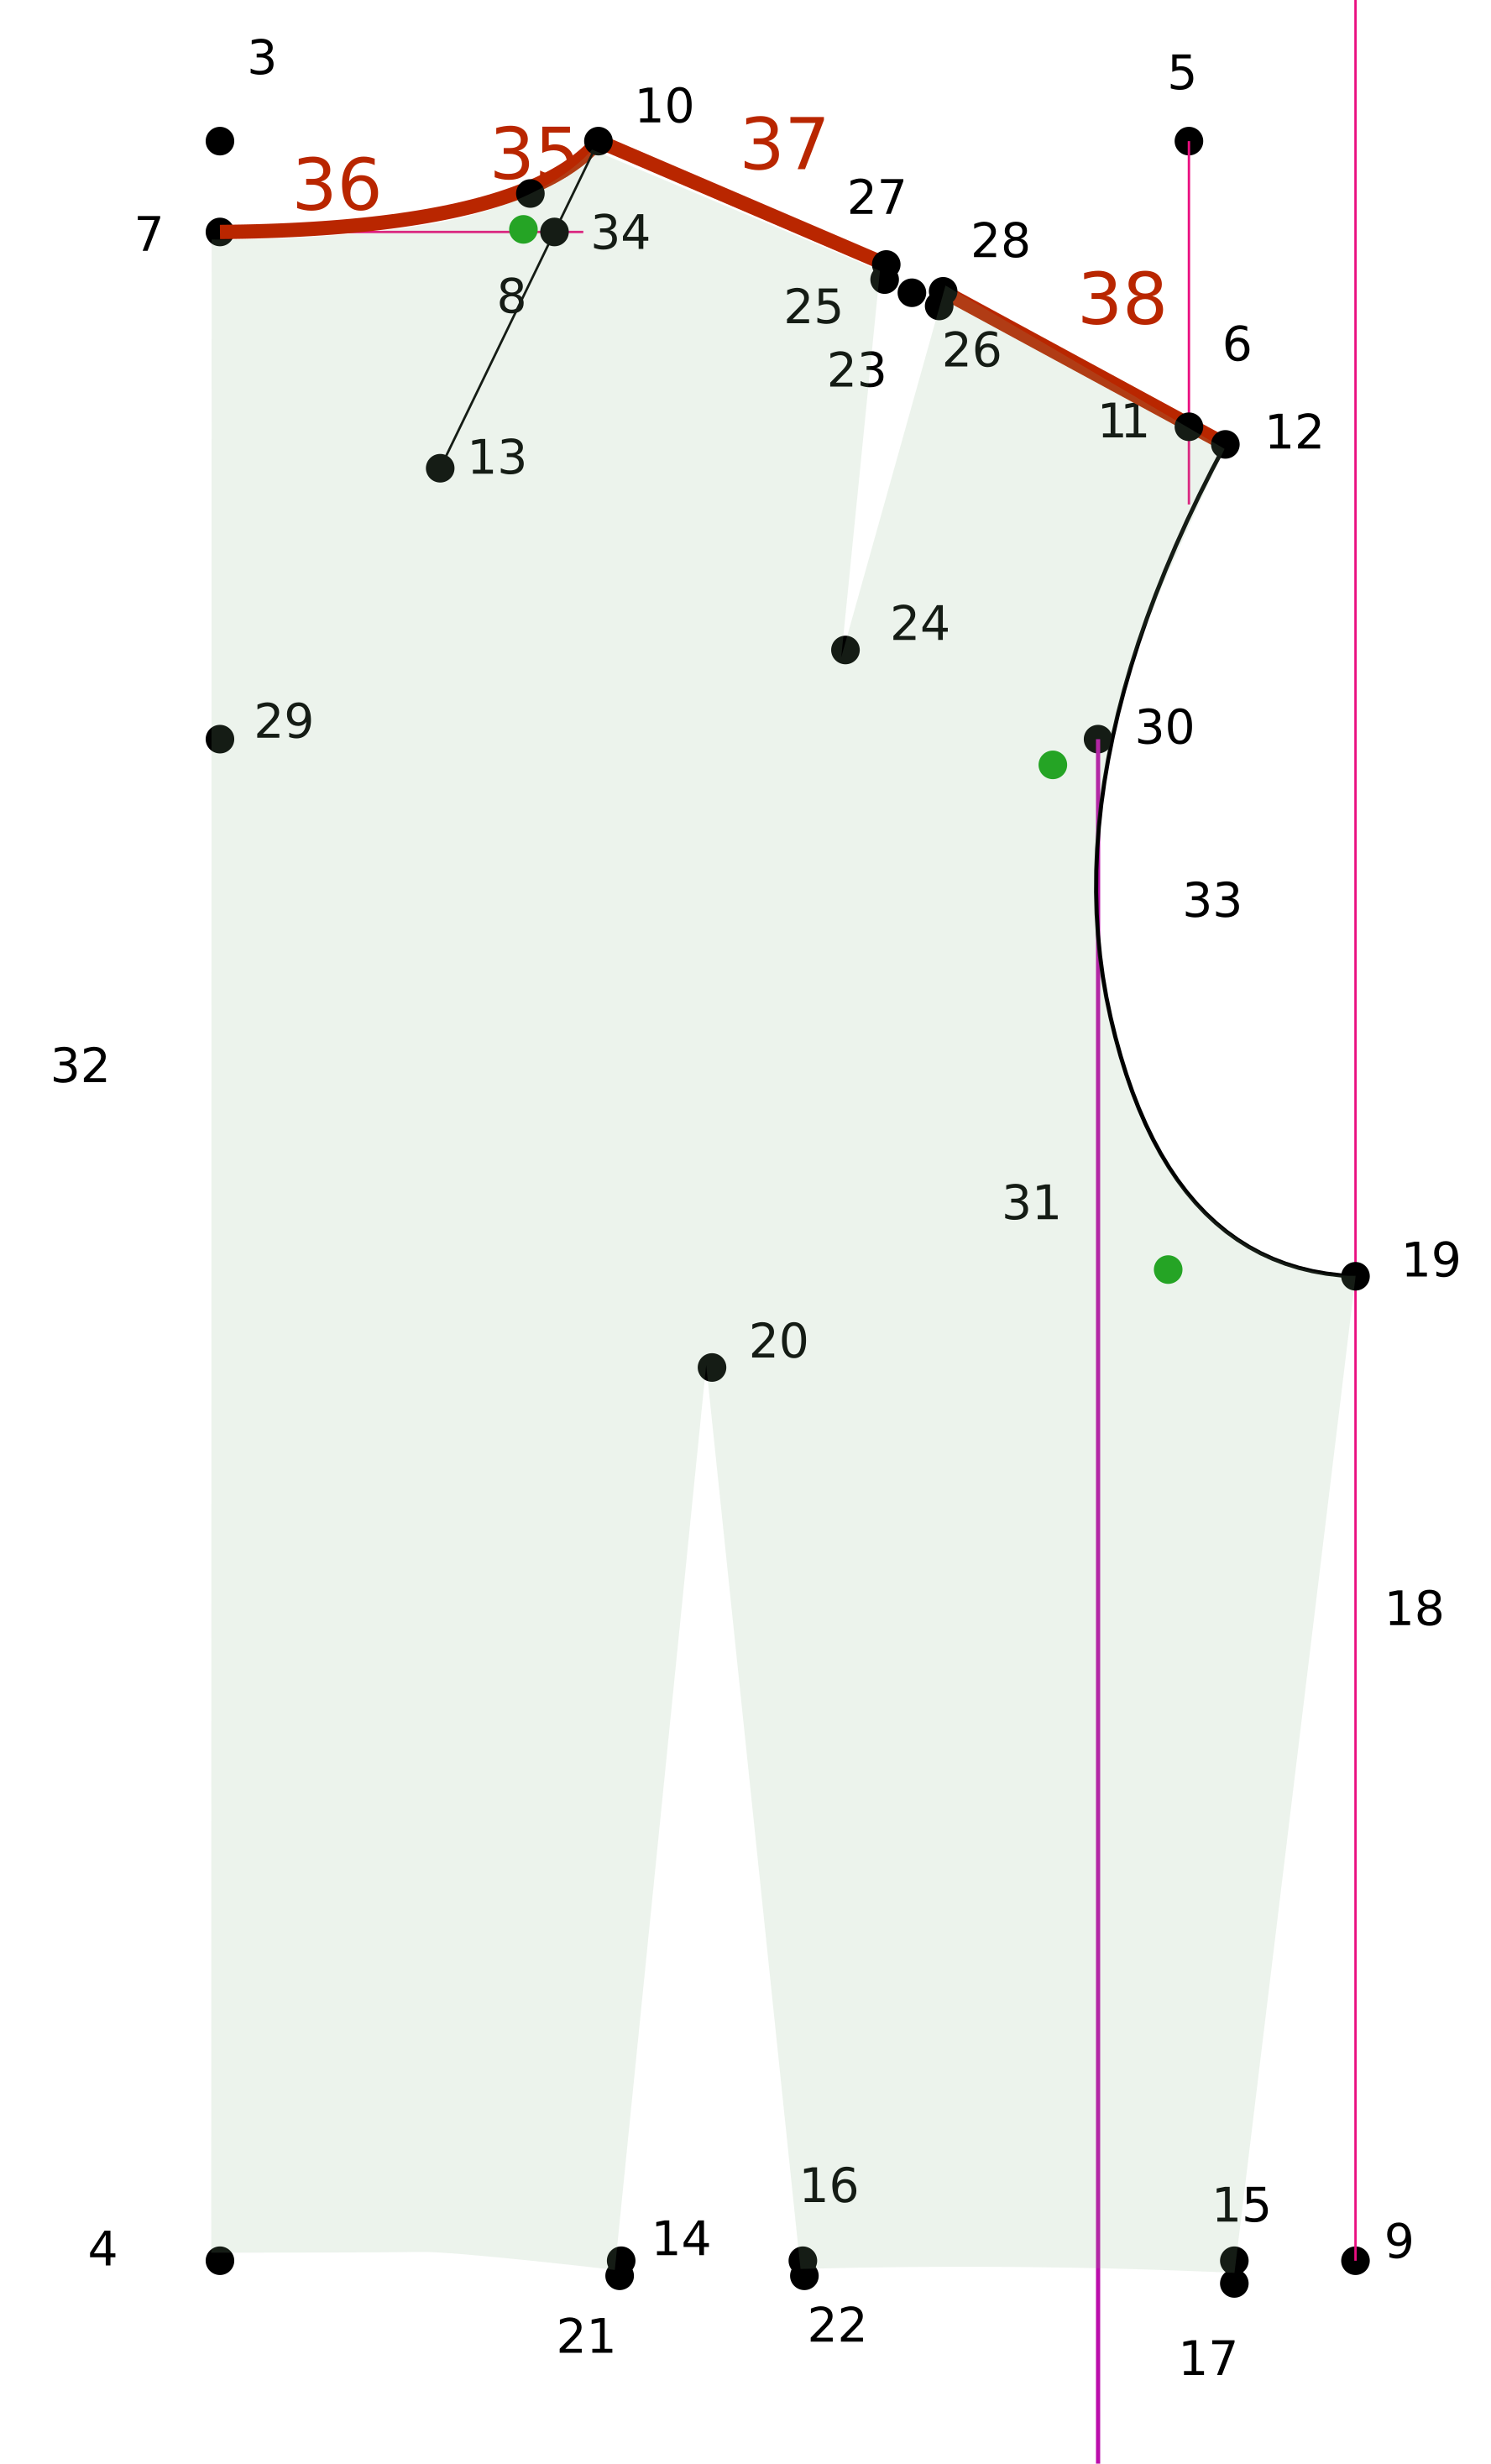
35 Curve Guide
Bisect: 7 Center Neck10 Side Neck
Extend: 34 Intersect
Distance: 0.375" or 10 mm
36 Neckline
7 Center Neck10 Side Neck
Curve Points: 1
Curve down to 35 Curve Guide8 Neck Ref Line
37 Shoulder Line
10 Side Neck27 Shldr Dart Leg 1
38 Shoulder Line
28 Shldr Dart Leg 212 Shoulder Tip
40 Waist Curve
17 Side Waist22 Waist Dart Leg 2
Curve Points: 1
Curve very slightly
41 Waist Curve
21 Waist Dart Leg 14 Waist Ctr
Curve Points: 1
Curve very slightly.
43 Waist Dart
Apex: 20 Waist Apex
Dart Leg Stay: 21 Waist Dart Leg 1
Dart Leg Fold: 22 Waist Dart Leg 2
Direction: 4 Waist Ctr
Name: WaistDart
44 Shoulder Dart
Apex: 24 Shoulder Apex
Dart Leg Stay: 27 Shldr Dart Leg 1
Dart Leg Fold: 28 Shldr Dart Leg 2
Direction: 10 Side Neck
Name: ShoulderDart
45 Center Back SA
If you are going to cut the back on the fold:
Select: 42 Center Back
Value: Custom Value
0 (zero)
46 True Neckline
First: 36 Neckline
Seam: 42 Center Back
Second: 36 Neckline
Seam: 42 Center Back
Move the neckline green curve point to create a smooth curve. Update to view changes.
47 True Armhole
First: 33 Armhole
Seam: 39 Side Line
Second: Front Pattern 24 Armhole
Seam: Front Pattern 31 Side Line
Move the curve points on either armhole to create a smooth transition. Update to view changes.
49 Label Pattern
Select a location for the pattern label.
Name the pattern, measurement set used, date and cutting instructions. (Ex: Cut 1 on Fold, Cut 1 / Flip Cut 1, etc).
50 Measurement Notes
You may choose to add the 33 Armhole36 Neckline
51 Center Back Fold
If you are going to cut the back on the fold:
Select: 42 Center Back
Make sure the marking is inside the pattern, Other Side if not.
52 Grainline
If you aren't going to cut the back on the fold:
Vertical
Click near 42 Center Back
Length: {Center Length Back} * .75
53 Seam Allowance
Select: 36 Neckline37 Shoulder Line44 Shoulder Dart38 Shoulder Line33 Armhole39 Side Line40 Waist Curve43 Waist Dart41 Waist Curve42 Center Back
If the blue seam allowance draws to the inside of the pattern, select Other Side.
54 Armhole Notch
Select: 33 Armhole
Distance: 3" or 76 mm
From: 19 Armpit
Type: Double
Should be outside 33 Armhole
56
File > Export PDF
Choose the appropriate page size and print your final pattern.
 Layers > Add Layer
 Points > Add Free Point
 Points > Add Point from Point
 Lines > Add Reference Line
 Points > Point on Line at Distance
 Points > Add Point on Vector
 Points > Add Point Perpendicular
 Points > Add Point from 2 Points
 Curves > Add Curve
 Points > Add Point at Intersection
 Points > Bisect Points
 Lines > Add Line
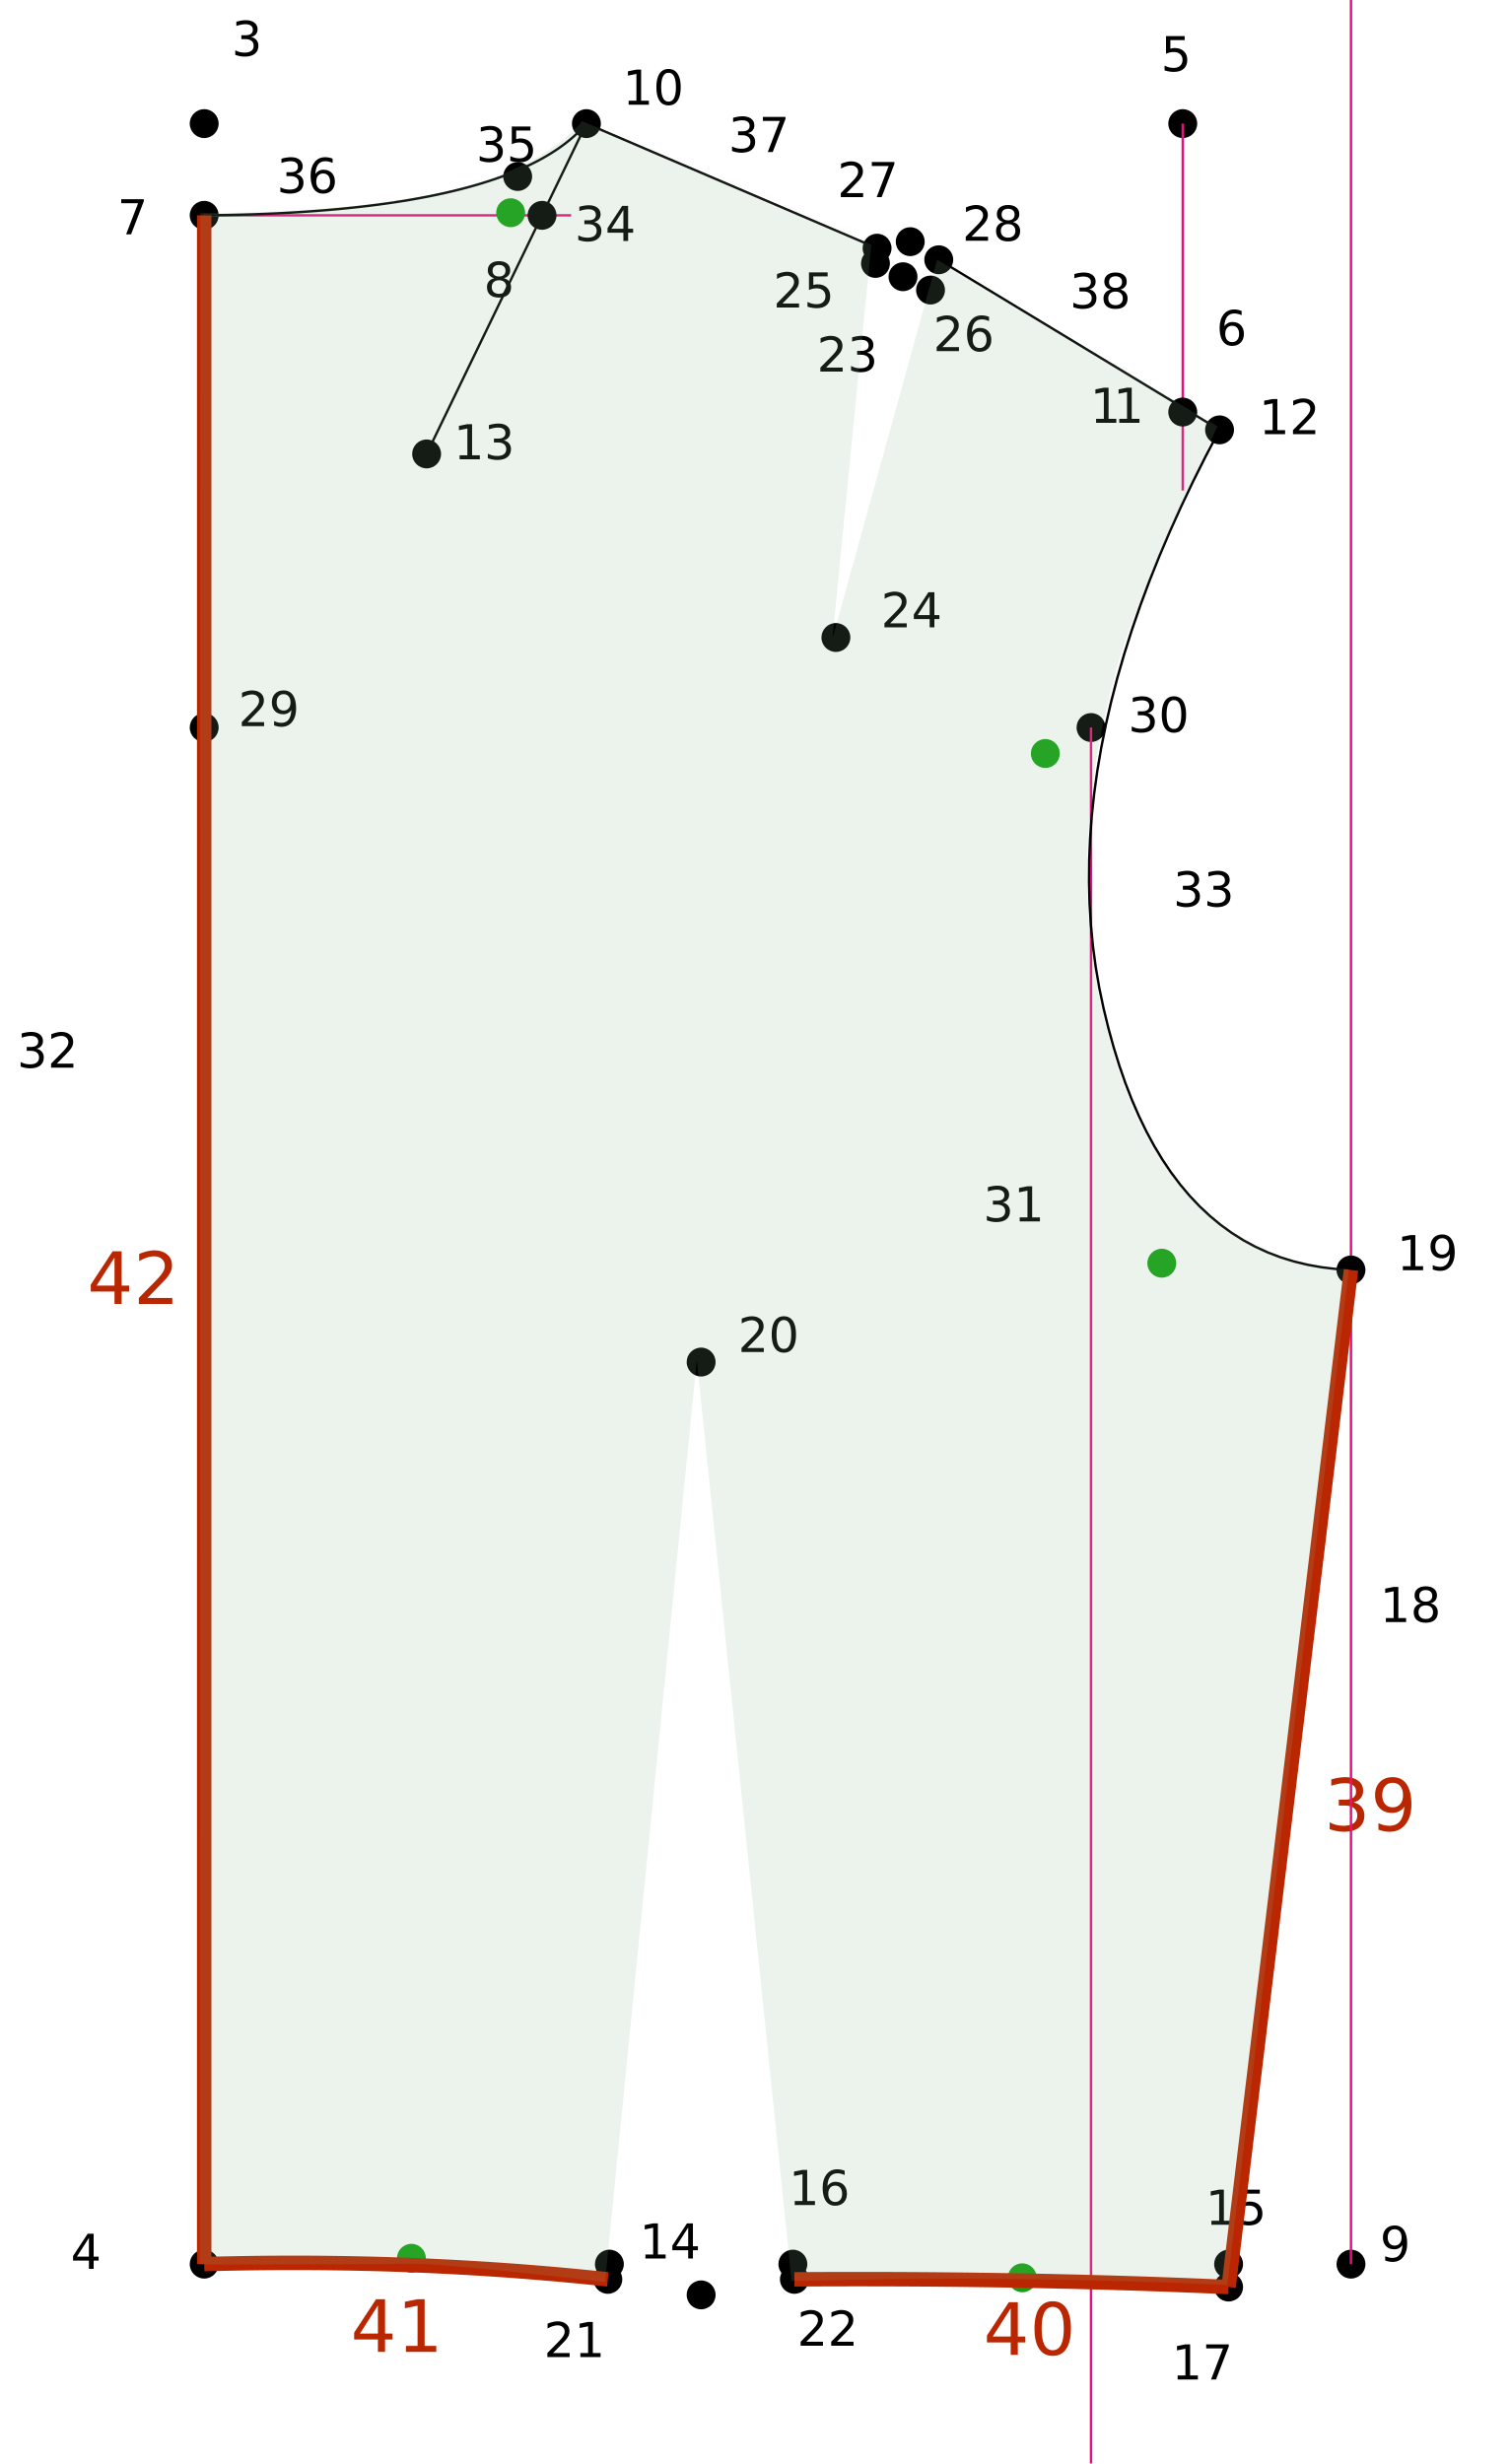
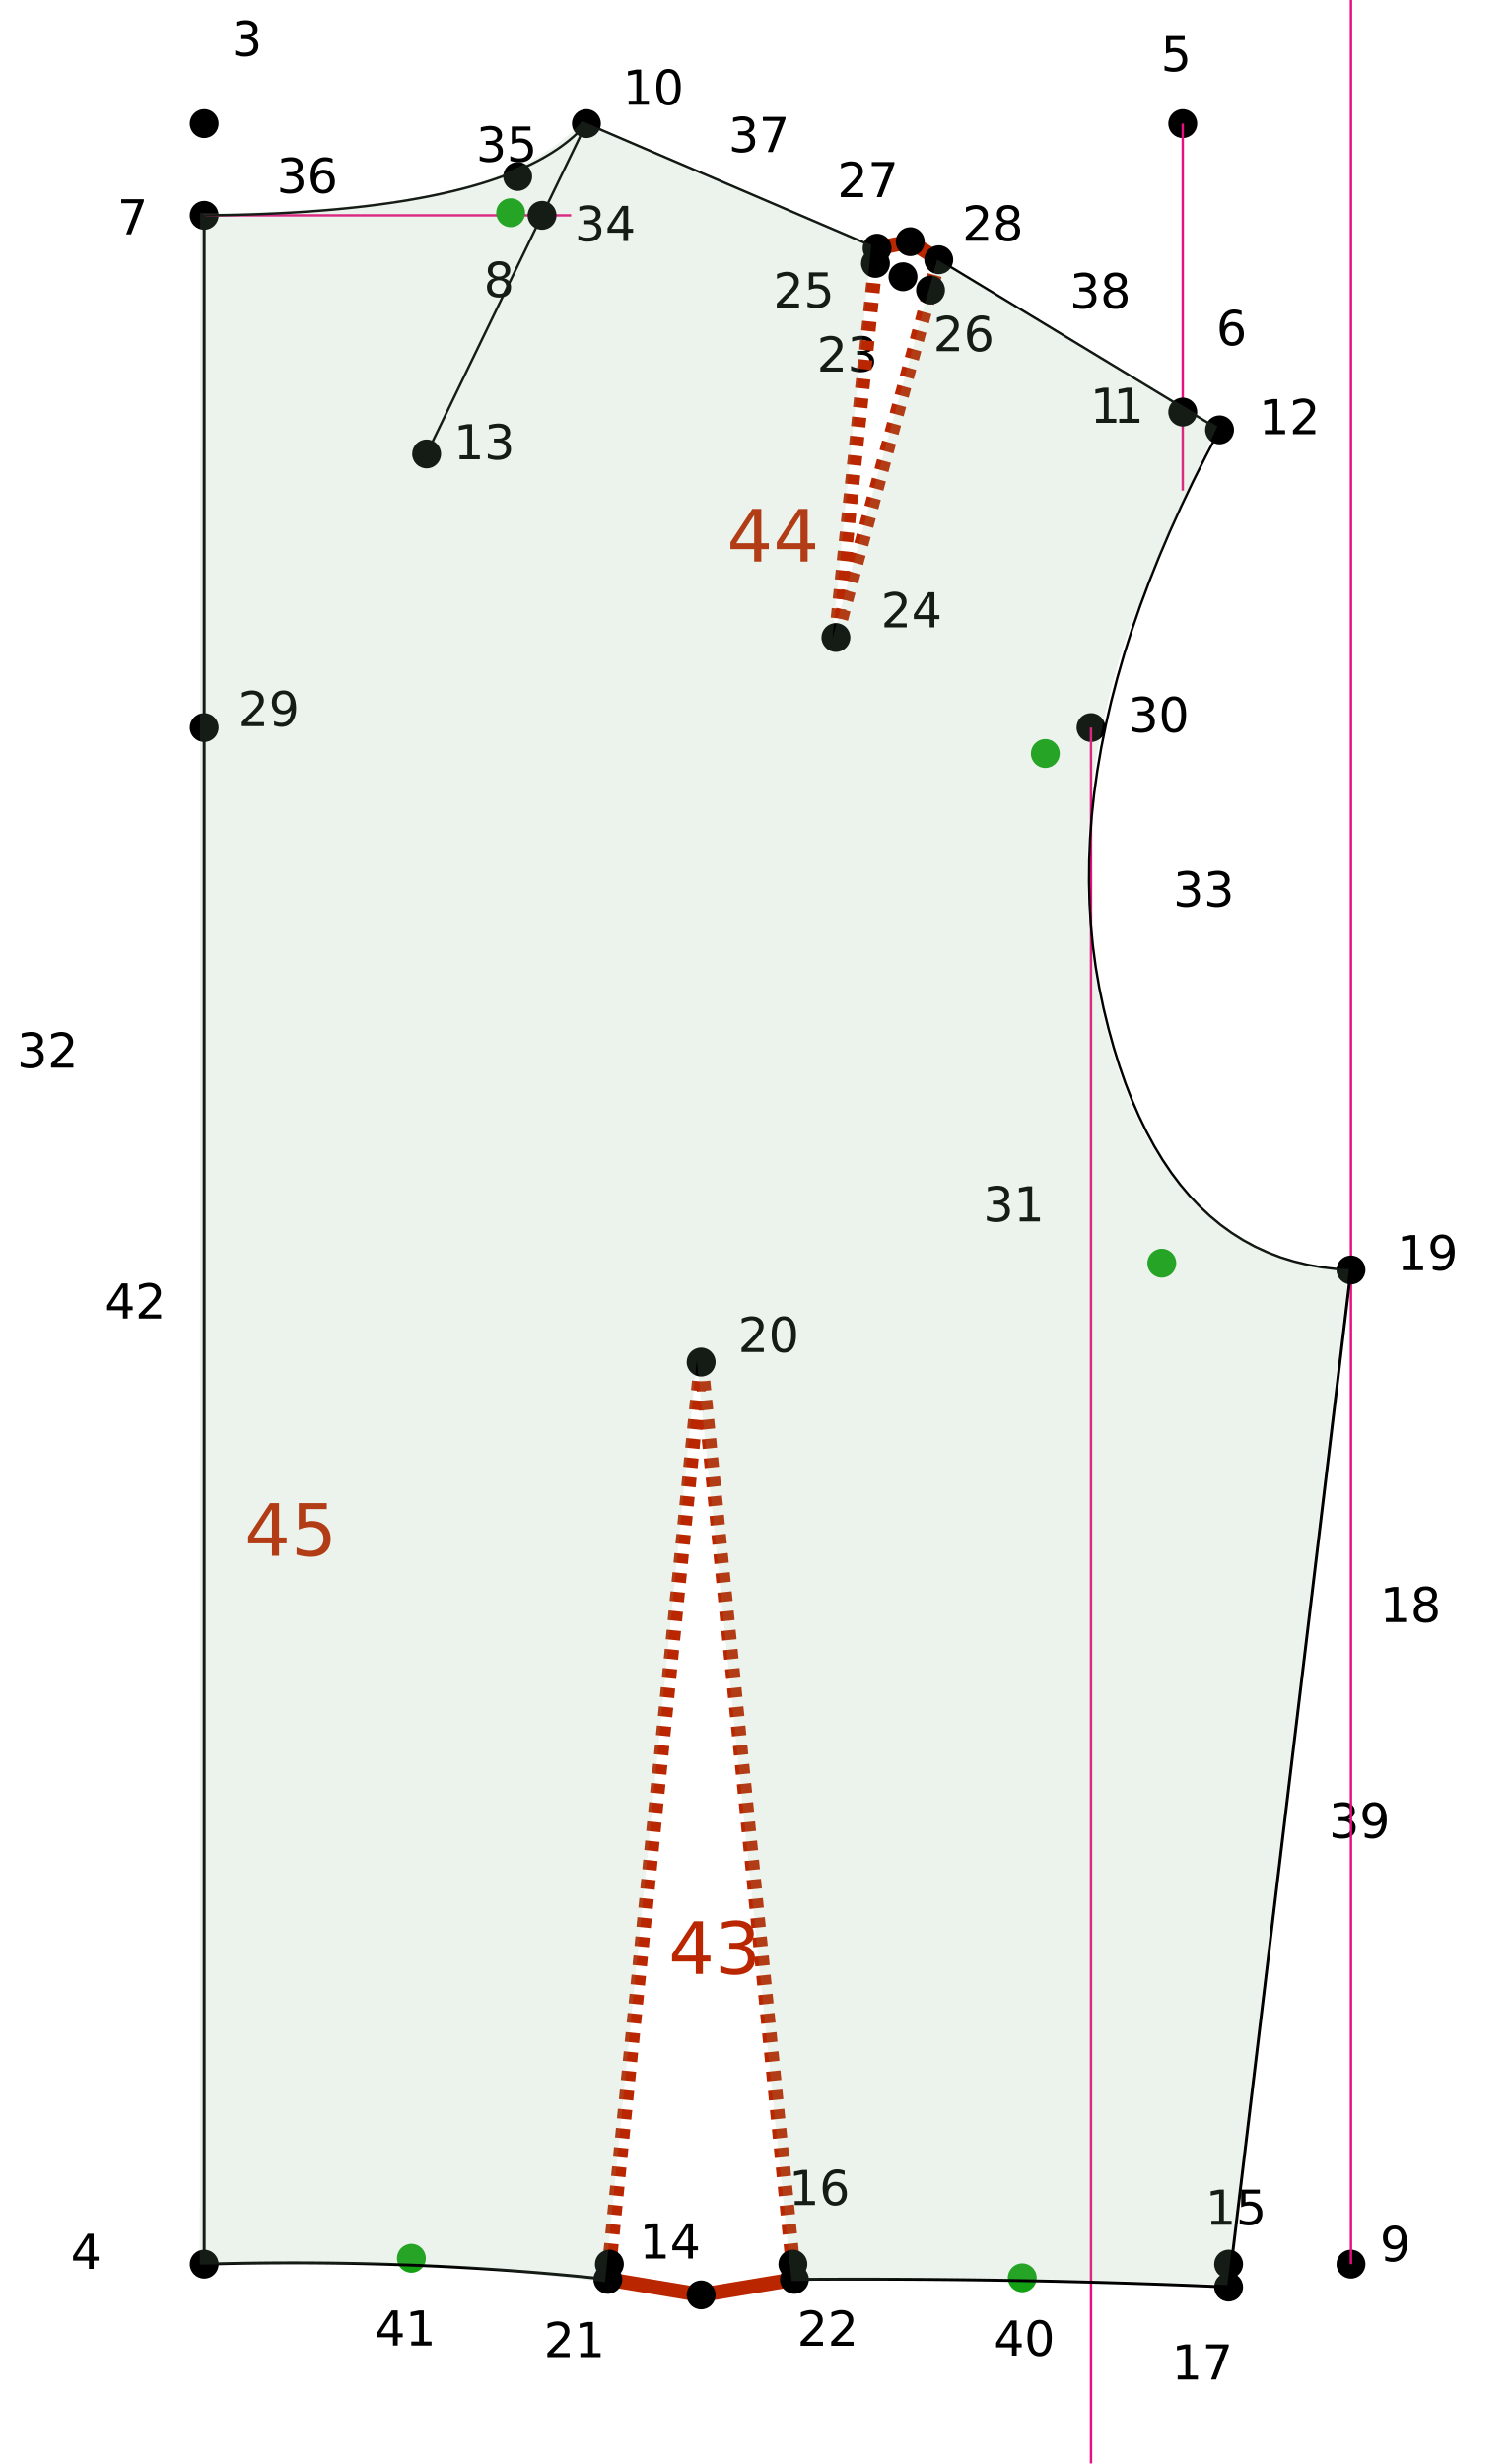
 Darts > Register Dart
 Finish > Change Line/Curve Seam Allowance
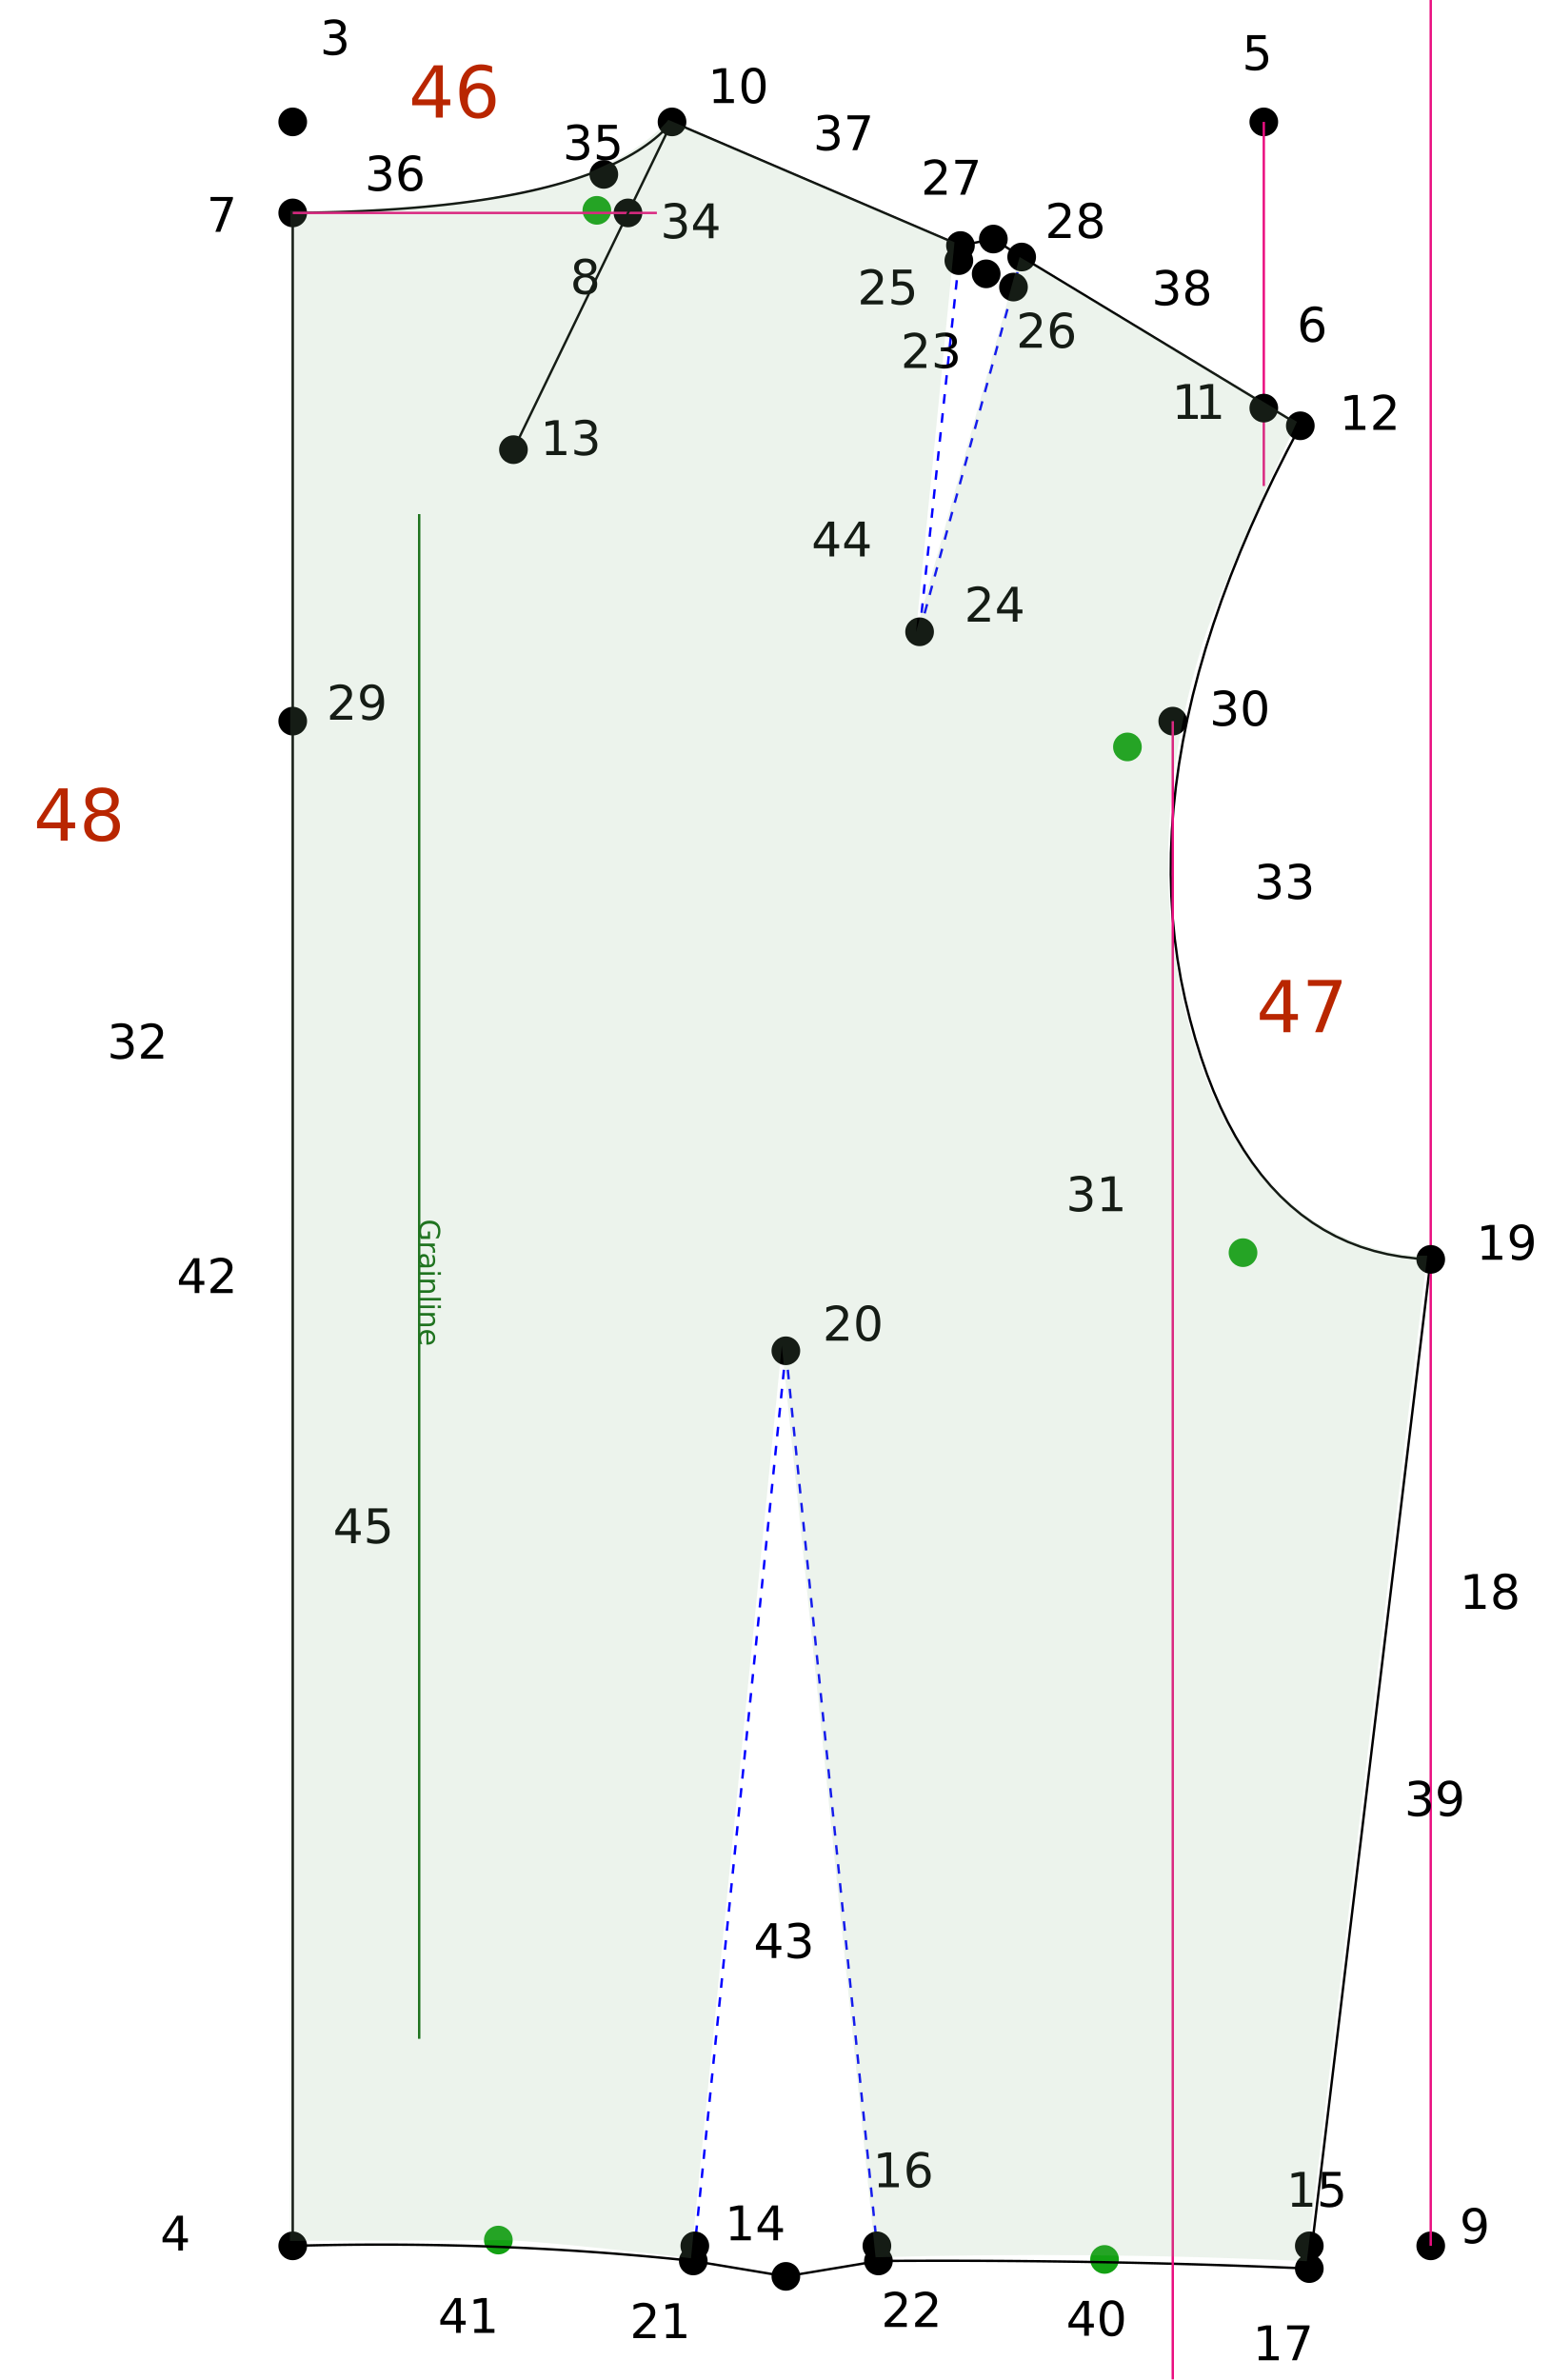
 Finish > Curve Truing
 Layers > Layer Visibility
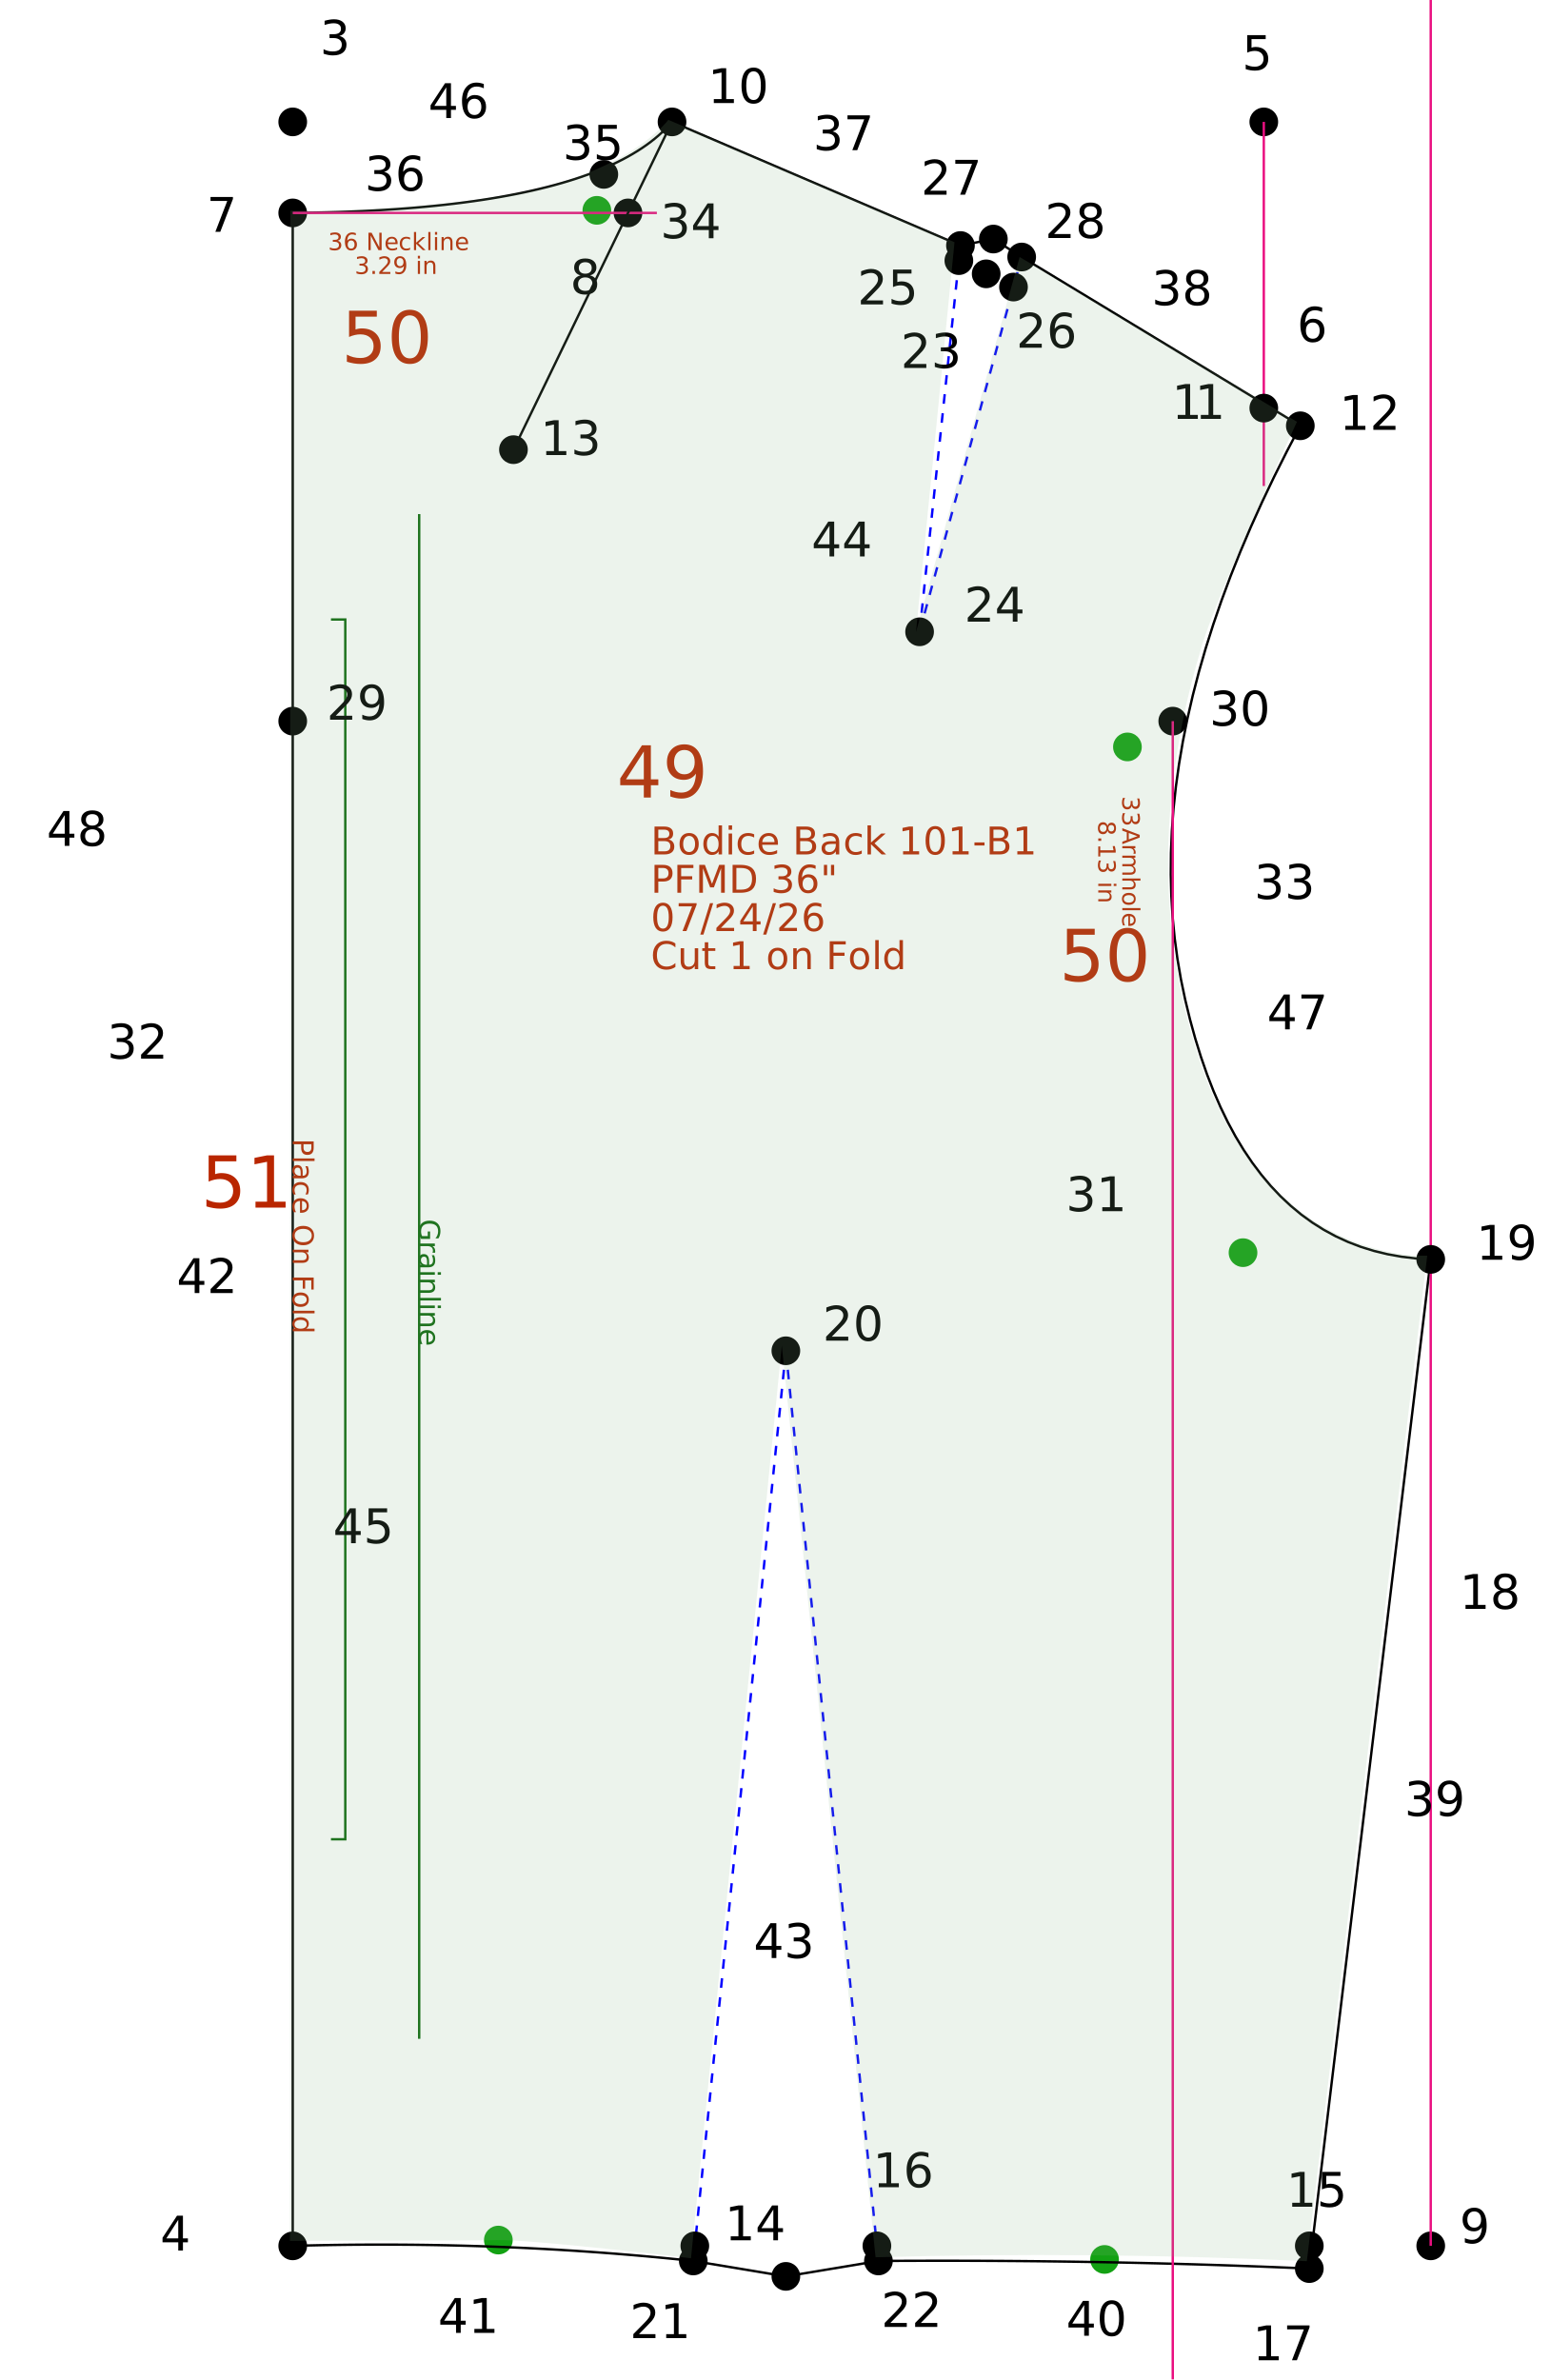
 Finish > Add Text at Point
 Finish > Add Measurement Text
 Finish > Add Cut on Fold
 Finish > Add Grainline
 Finish > Add Seam Allowance to Pattern
 Finish > Add Notch
 Finish > Hide Points