Seam Allowances
A seam allowance is the extra fabric you add outside the stitching line (the seamline) so there is something to sew. The seamline is the real shape of the garment. The cut edge is only there to give you fabric to work with.
Adding the same width all the way around a piece looks easy, but the wrong widths, awkward corners and mishandled curves are some of the most common reasons for puckered seams, twisted silhouettes and hems that will not lie flat.
Home-sewing pattern companies settled long ago on 5/8" (16 mm) on every edge, so sewers would always expect the same width and make fewer cutting mistakes. Professional sewers rarely do that. They usually default to about 1/4" (6 mm), vary the width from seam to seam, and mark the seamline instead of trusting the cut edge. As the drafter, you get to choose.
Stitching Lines
As you know, sewing patterns are outlined and cut out on the seam allowance line. Other than a brief mention in the instructions of the seam allowance width, you never actually see the stitching line of the pattern without the seam allowance. This causes a lot of confusion when you start drafting.
The seam allowance is secondary to the design process itself. It is one of the very last things that will be added when drafting. It is simply a border added at the very end to allow for joining the pattern pieces.
All your design and measurements are to the stitching line. That is the most important part of the draft. The drafted side seam of the front and back must be the same length. The same thing goes for the shoulder seam or inseams of pants.
Your sewing skills will increase greatly if you keep this in mind as you are constructing your garments. Nowhere is this more important than a shoulder seam as illustrated below. Always align your patterns on the stitching line, not the seam allowance. When shoulder lines meet at an angle (like at the neck point or armhole), the raw outer corner of the seam allowance sticks out at a different angle than the actual sewing corner. Matching raw edges on angled seams guarantees misalignment on the actual stitching line.
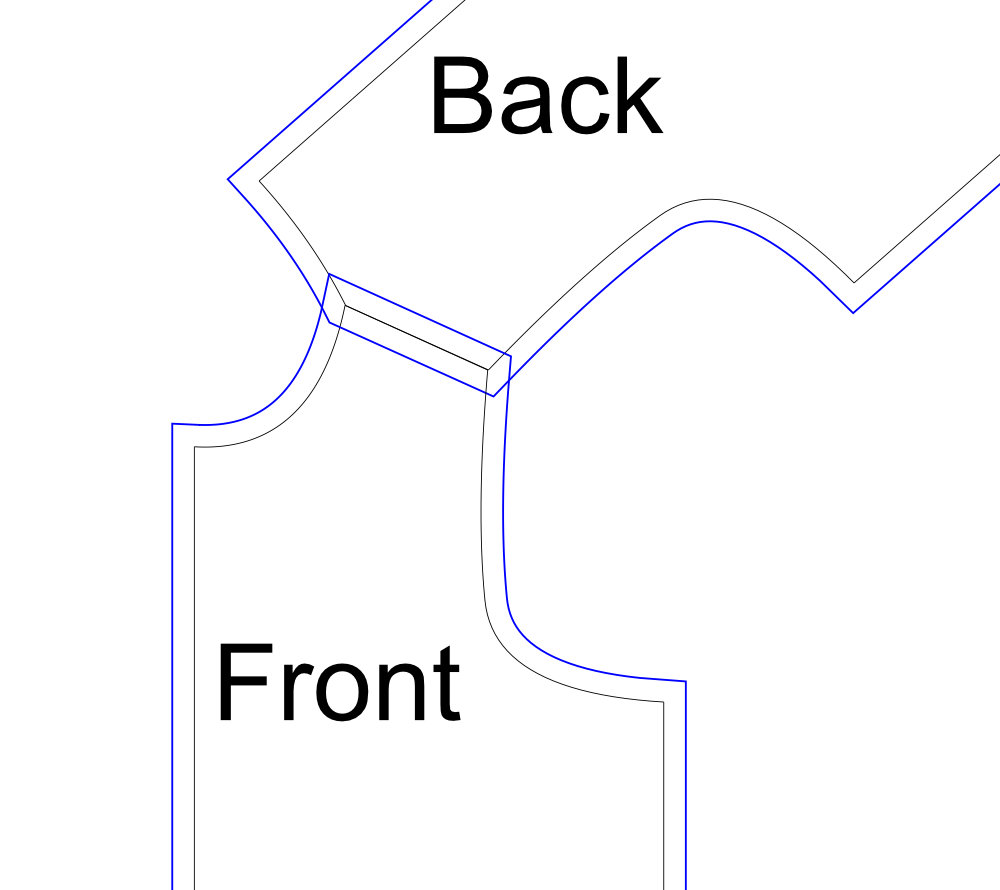
Bodice Shoulder Seam Aligned on Stitching Line
You may even choose to pencil in missing stitching lines to aid in alignment. PatternMaker Pro patterns include both the seam allowance and stitching lines in different colors to distinguish them.
Standard Seam Allowance Widths
The same width everywhere makes extra bulk, or makes tight curves hard to sew cleanly. Let each seam's job decide its width.
| Seam Type | Common Uses | Standard Width | Why |
|---|---|---|---|
| Enclosed or Curved | Collar edges, neckbands, cuffs, lapels, pocket flaps | 1/4" (6 mm) | Nothing to trim away after sewing, and it turns without bubbling. |
| Standard Structural | Bodice side seams, shoulder seams, sleeve seams | 1/2" (13 mm) or 5/8" (16 mm) | Strength and room for small fitting changes. |
| Armholes and Set-in Sleeves | Armhole seams joining sleeve to body | 3/8" (10 mm) to 1/2" (13 mm) | Less binding under the arm and no bulky ridge inside. |
| Knit Seams | Side, shoulder and sleeve seams sewn on a serger | 3/8" (10 mm) | Knits fray and run easily, and this suits a four-thread serger. |
| Straight Hems | Shirt, jacket, straight skirt and pant hems | 1" to 1 1/2" (25 to 38 mm) | Adds weight for a clean drape and room to blind-hem or double-fold. |
| Curved or Flared Hems | Circle skirts, curved shirttails | 1/4" to 1/2" (6 to 13 mm) | A narrow edge does not bunch when it is pressed to the inside of a curve. |
Widen the seam allowances on fabrics that fray easily. Loosely knit sweater knits need a wider allowance too, so the edge does not unravel or run.
For knits, keep straight hems at 1" (25 mm) or more. Cover-stitching stretches the stitched edge, and the extra depth keeps the folded edge steady while you press the stitched edge back into shape. A curved hem is the exception. It can only take about 1/2" (13 mm), though any stretching shows less on a curve and presses back into shape more easily.
Corners: Hems and Points
When two seamlines meet at anything other than a right angle (90°), tracing parallel lines out to where they cross gives you cut edges that do not line up once they are folded or stitched.
Tapered Hems in Woven Fabric
When a side seam angles in or flares out toward the hem, the hem allowance cannot simply keep going straight down. It has to be mirrored across the hem fold line.
- The Problem: On a leg that tapers toward the hem, a hem allowance drafted straight down is too narrow for the wider leg above it. When you fold it up, it pulls and the hem cups.
- To Draft: On the paper pattern, fold the hem allowance up along the finished fold line, trace the side seam through the folded layers, and cut. Unfold it and the allowance flares out at exactly the angle it needs to match the garment above.
Tapered Hems in Knit Fabric
Knits are drafted differently. Draw a line parallel to the bottom edge of the hem, then square the sides down from the fold line at 90°.
- Why: This allowance ends up slightly smaller than a flared one, so it does not stretch out when you sew it and it actually pulls the hem in a little. A flared allowance on a knit gets larger when it folds up and stretches out under the needle.
- To Draft: Square a line down at 90° from the side seam at the finished hem fold line, for the depth of the hem.
The Add Hem tool in PatternMaker Pro has options for both woven and knit. It draws the hem extension for the fabric you choose.
Sharp and Wide Corners
- Sharp Points (under 90°): At collar points, lapels and deep V-necklines, a plain offset makes a long, extended point. Square off (blunt) the tip of the cut edge. It gives the machine foot a clear place to start and cuts down on bulk inside.
- Wide Corners (over 90°): Make sure the seam allowances meet squarely so the cut edges line up without false notches or overhangs.
Curved Seams: Convex and Concave
The cut edge of a curve is a different length from the seamline, and that difference causes most of the trouble on curved seams.
- Convex (Curves Outward): The cut edge is longer than the stitching line. Turned to the inside, that extra length has nowhere to go and ripples. Keep the allowance narrow, 1/4" to 3/8" (6 to 10 mm), or cut small wedges out of it. The wedges close as the seam takes its shape.
- Concave (Curves Inward): The cut edge is shorter than the stitching line. If the allowance is wide, it holds the seam back and it will not open flat. Clip in toward the seamline to release it. The clips open as the seam takes its shape.
See Pattern Markings & Annotations for how to mark clips and wedges on a pattern, including how close to the seamline to stop.
Joining Seams with Different Allowances
Sometimes a pattern joins edges with different allowance widths, such as a collar stand with a 1/4" (6 mm) allowance sewn to a neckline with a 1/2" (13 mm) one.
Always match pieces by their seamlines, never by their cut edges.
Joining different seam allowance widths comes from poorly thought-out drafting. Avoid giving a pattern mismatched allowances wherever you can.
Using PatternMaker Pro
After opening a new draft, set the default seam allowance with the Set Seam Allowance Defaults tool. Then add seam allowances with the Add Seam Allowance to Pattern tool. You can change the allowance on any single line with the Change Line/Curve Seam Allowance tool.