Fullness Types
Dart manipulation moves the fabric a pattern already has. Adding fullness is different: it makes the pattern piece bigger, so you get volume, drape, flare or gathers.
You add fullness to a sloper with slash-and-spread. Cut the pattern along lines, spread the pieces apart, and trace a new outline. How you cut and spread decides the kind of fullness you get.
Three Kinds of Fullness
Parallel (Equal) Fullness
Equal fullness adds the same amount all the way along a section, like a dirndl skirt.
- Draw parallel lines across the piece from one edge to the other.
- Cut all the way through, so you have separate strips.
- Put a fresh sheet of paper underneath.
- Spread the strips evenly, for example 1" (25 mm) between each one.
- Tape them down and trace a smooth new outline along both edges.
Both edges grow by exactly the same amount. Use it for peasant sleeves, gathered dirndl skirts and smocked bodices.
One-Sided (Flared or Tapered) Fullness
One-sided fullness adds width along one edge only. The opposite edge stays at its original length and works as a hinge. A flared skirt is an example: the hem grows and the waist does not.
In the pictures below, the bust dart was moved to center front first. Then 1.5" (38 mm) of fullness was spread at each of three more slash points. Gather those sections and sew the fronts together, and you get soft shirring at center front. The grey triangles show the added fabric.
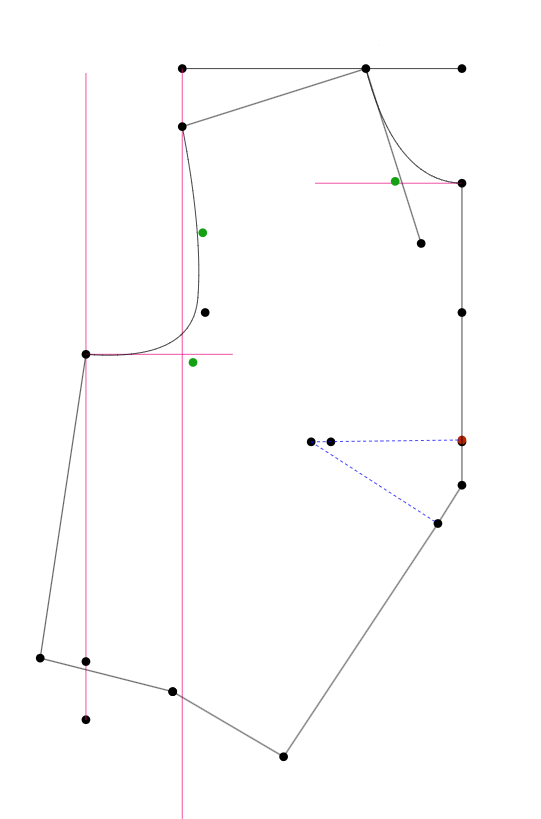
Bust Dart Moved to Center Front
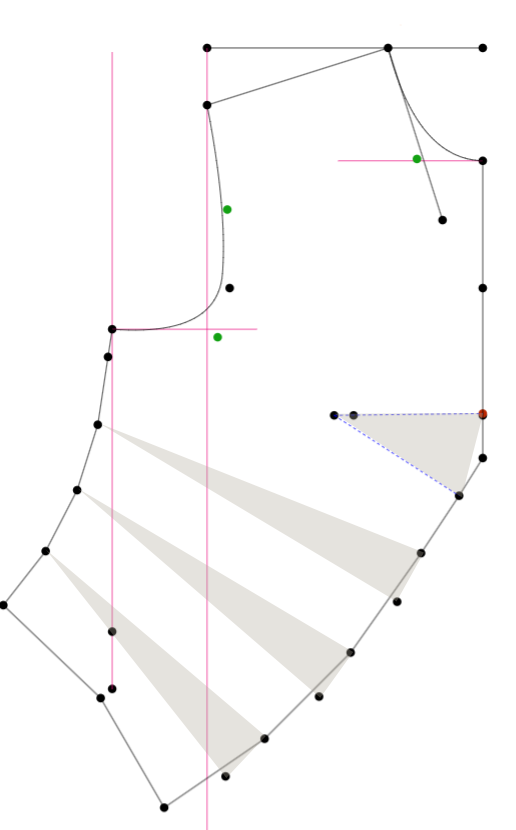
One-Sided Fullness Added to Center Front at 3 Points
- Draw lines from the edge that needs fullness across to the opposite seamline.
- Cut along them, leaving a small paper hinge at the opposite edge.
- Put a fresh sheet of paper underneath and fan the slashes open into triangles.
- Tape them down and trace a smooth new outline along the fanned edge.
Leave the fanned edge ungathered for a smooth flare, as in an A-line skirt or a flutter sleeve. Or gather or pleat it into a smaller band or cuff.
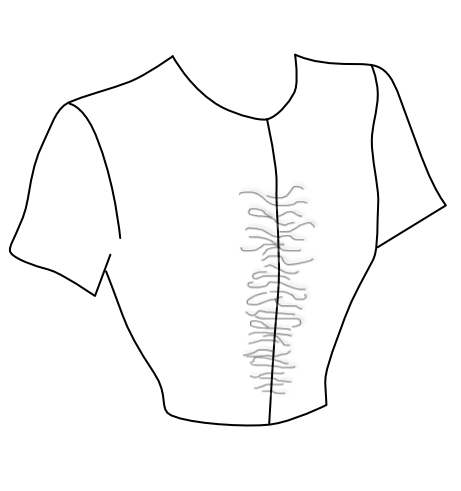
Gathered Center Front Bodice Sewn
Fullness on Sleeves
- Puff Cap Only: Slash from the cap down to the hem, with hinges at the hem. Fan the cap open for extra length and gathering room over the shoulder, and the cuff width stays the same.
- Puff Wrist Only: Slash from the hem up to the cap, with hinges at the cap. Spread the bottom wide, and the armhole fit stays the same.
Unequal Fullness
With unequal fullness both edges grow, but one grows more. Cut all the way through and spread each slash wider at one end than the other. A flared skirt with a gathered waist is an example: a little extra at the waist, a lot more at the hem.
Slash-and-spread is not the only way. You can add a little ease at the side seams, or leave a dart unsewn so its fullness stays in the garment.
Grainline and Truing
- Grainline: For parallel sections, line up the center section with the straight grain. For flares, put the grainline through the center so the drape falls evenly on both sides.
- Truing: Spreading leaves jagged, stepped edges along seamlines and hems. Blend them into a smooth, continuous curve before you add seam allowances.
Before you mark the hem on a test skirt with a lot of flare, hang it overnight so the grain can drop.
Calculating Fullness
Most drafting books just say "spread as desired," which is no help when you need a number. Work it out from a ratio.
Two things decide the ratio. Firmly woven fabric limits how much you can gather into a seam, and lightweight fabric can take a lot more. Cost matters too, because more fullness means more fabric.
| Ratio | Fullness | Fabric |
|---|---|---|
| 1.5 to 1 | Light | Medium to heavy fabrics, or when yardage is tight |
| 2 to 1 | Average | Most medium-weight woven fabrics |
| 2.5 to 1 | Full | Lighter fabrics |
| 3 to 1 and up | Very full | Chiffon and other lightweight fabrics, up to about 4 to 1 |
The Formula
- Measure the original seamline.
- Multiply it by your ratio to get the target length.
- Subtract the original length. That is the total spread to add.
- Divide the total spread by the number of slashes.
Example: 10" (250 mm) seamline, 2 to 1 ratio. The target is 20" (500 mm), so you add 10" (250 mm).
- 5 slashes: 2" (50 mm) per slash.
- 2 slashes: 5" (125 mm) per slash.
Spread the same total over more slashes and each gap gets smaller. Small gaps blend into a smooth curve when you true the edge. A few wide gaps leave sharp angles that are hard to true.
Adding Fullness in PatternMaker Pro
You can add parallel, one-sided and unequal fullness with the Add Fullness tool. Use it with the Move Dart tool for the one-sided example above.